Scale Model Shop

Collapse

Ed Force One

Collapse
This topic is closed.
X
X
 
  • Time
  • Show
Clear All
new posts
  • Guest

    #1

    Ed Force One

    My brother, a pretty large Iron Maiden fan, asked me a couple of years ago to build the Revell kit of Ed Force One for him.
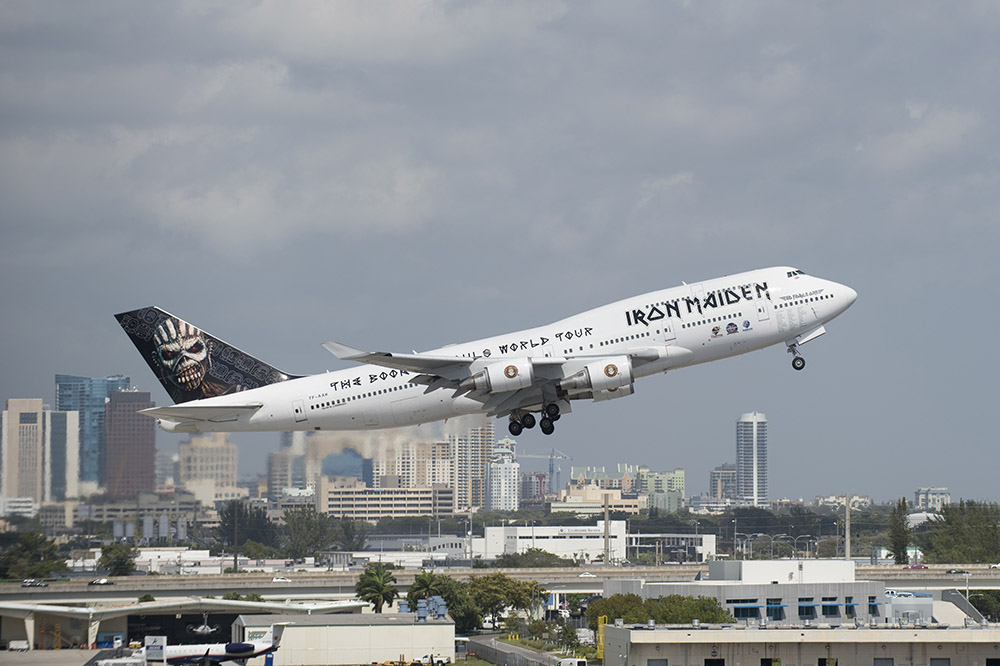


    Civilian aircraft aren’t my thing, but a plastic kit is a plastic kit is a plastic kit, right? I remembered today I took a bunch of photos during construction, so I thought I’d share them.

    As I didn’t take a picture of the box, here’s what it looks like when grabbed from a random website:


    It’s pretty big, but one of those annoying Revell ones that open at the ends instead of having a proper lid you can remove and put under the rest of the box so you can get at the parts. As for what you get in the box:

    [ATTACH]319073[/ATTACH]
    [ATTACH]319074[/ATTACH]
    [ATTACH]319075[/ATTACH]

    It looks like a somewhat older model that Revell have made a few variants of (going by several blanked-off windows, some of which the instructions tell you to open up) and added a sheet of very nice decals to.
  • Guest

    #2
    Starting construction with the fuselage, I found it needed some ledges to which the bottom plate (with the undercarriage) can be glued, else it would just drop into the fuselage. Here’s one of the two, made from Games Workshop trapezoidal sprue:

    [ATTACH]319078[/ATTACH]

    With the underside now fitting firmly, I could find the model’s balance point because it was to be built wheels-up on a flying stand (not included in the kit). I put a modeller’s square into a glue clamp, taped the wings and tailplanes to the model, and then set it on the thick end of the square until it was balanced:

    [ATTACH]319079[/ATTACH]

    The stand would be made from a stainless steel rod, so after drilling a hole for it at the balance point, I now had to construct a way to attach the model. I went for a piece of plastic tube of the correct inner diameter, with two sizes of larger tube around the lower end to reinforce it:

    [ATTACH]319080[/ATTACH]

    And glued it into the model:

    [ATTACH]319081[/ATTACH]

    Where the tube sits against the fuselage roof, I added more GW sprue around it to make sure it wouldn’t ever move.

    Comment

    • Guest

      #3
      There really isn’t much more to be said about construction, other than that it’s an older Revell kit and so fit isn’t exactly great. Most parts needed a fair amount of work to fit correctly, which was especially important because I left the wings loose until after painting, to make both painting and adding the decals easier.

      This is some of the parts, masked off for the first coat of paint:

      [ATTACH]319083[/ATTACH]

      On the engines, I first painted the insides and the bare metal front edge, then masked their front and rear:

      [ATTACH]319084[/ATTACH]

      All the yellow tape is Tamiya, and one-cent coins fit very nicely to mask off the fronts of the engines

      [ATTACH]319085[/ATTACH]

      I then applied a coat of white paint from an automotive spraying can to the engines and the leading edges of the wings, because there would be a white stripe there. After the white paint had dried, I masked off the rest of the engines and those white stripes:

      [ATTACH]319086[/ATTACH]

      Note that one the outboard left engine, the masking doesn’t go all the way to the front, because Ed Force One had an accident on the ground at one point in which an engine was damaged so far that it had to be replaced, by one with a grey cowling. Since this would look more interesting on the model (and the kit provides the necessary decals for both the original and the replacement), we opted for that one. After masking, I sprayed the whole wings and tailplanes with grey automotive primer. The bare metal areas I then hand-painted.

      Next, decals. I only have a photo of the left side of the fuselage:

      [ATTACH]319090[/ATTACH]

      Some of these were quite tricky, I must say. I tore one of the THE BOOK OF SOULS WORLD TOUR decals (the one on the right side) when trying to move it after I put it in an incorrect position, and it folded up onto itself, giving me a very great deal of trouble trying to get it all sorted out again I like the way they did the window edging, though: lengths of decal with the outlines printed on, and they line up exactly with the moulded-in windows — this solves two problems at once, as it also adds the glass by means of the transparent part of the decal. The large tail decals requires a lot of Micro Sol to sit right, and I then still had to touch up parts with black paint.

      Unfortunately I don’t have any more construction/painting pictures, but there isn’t that much more to show, really: I just removed paint from areas to be glued and stuck the wings and tailplanes on

      Comment

      • Mini Me
        • Jun 2018
        • 10711

        #4
        I used to work on these "big girls" when I was with UAL in San Fran. Thanks for the memories.
        Cheers Rick H.

        Comment

        • Guest

          #5
          Interesting story about the plane and nice model too.

          Comment

          • Guest

            #6
            Cool!!!

            Comment

            • Dave W
              • Jan 2011
              • 4713

              #7
              Looks good.I worked on the 757 they used before this one.Bruce Dickinson used to fly 757's for 'Astraeus' and they lent him one for their 'Somewhere back in time' tour in 2008.

              Comment

              • Guest

                #8
                Thanks all, in the end I was quite satisfied with the model, but also glad I was done My advice to anyone wanting to build one too: buy this kit for the decals and buy another brand of 747 for the actual model (I’ve never built any others, but I’m fairly confident anything else will have fewer issues than this old Revell kit).

                Comment

                • scottie3158
                  • Apr 2018
                  • 14243
                  • Paul
                  • Holbeach

                  #9
                  Jakko,
                  Nice job,

                  Comment

                  Working...