Scale Model Shop

Collapse

SMER 1/48 Sukhoi su 22m4 in polish service

Collapse
X
 
  • Time
  • Show
Clear All
new posts
  • yak face
    Moderator
    • Jun 2009
    • 13840
    • Tony
    • Sheffield

    #1

    SMER 1/48 Sukhoi su 22m4 in polish service

    Heres one ive been wanting to get my teeth into for a while ,and seeing Marks recent purchase of the Eduard boxing spurred me on to start it. Its a build I wanted to follow on from my recent Su7 as it compares the first and last of the breed . The kit is a nicely tooled effort first released by Kopro and subsequently reboxed by SMER , Mistercraft and Eduard. Detail is good but the cockpit , particularly the seat could be a lot better , so ive got a resin cockpit and seat and the Eduard zoom etch set to replace these.
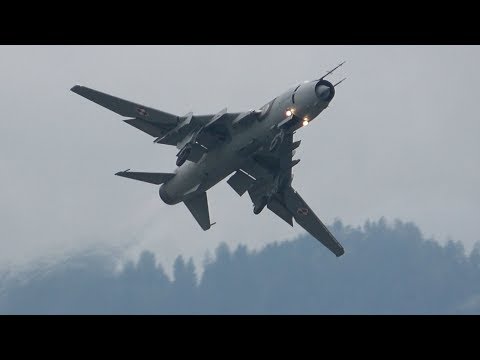
    I wanted to do the two tone grey scheme so had to sort some decals from various sources . One other thing I simply had to get was the resin flare dispensers . This was after seeing a video of a display by one of the polish pilots which was mighty impressive and constantly popping flares all the way through !
    Click image for larger version

Name:	1E3FA31A-88FF-4F4A-BE2C-D59501CD4E44.jpeg
Views:	3
Size:	3.5 KB
ID:	1162544Click image for larger version

Name:	2950AF71-1075-412F-B111-179E8E0E6BB1.jpeg
Views:	3
Size:	2.9 KB
ID:	1162545Click image for larger version

Name:	84C96291-8710-481A-82D8-E21D1DB724E2.jpeg
Views:	3
Size:	3.2 KB
ID:	1162546Click image for larger version

Name:	42258718-18FB-46B1-A7DC-4467F40E9123.jpeg
Views:	3
Size:	3.9 KB
ID:	1162547Click image for larger version

Name:	38C508C7-A32C-4360-B72E-90797D9B296C.jpeg
Views:	3
Size:	4.0 KB
ID:	1162548
  • Mark1
    • Apr 2021
    • 4156

    #2
    Nice one Tony i was hoping this would be your next build:thumb2: front row seat for me.

    Comment

    • adt70hk
      SMF Supporters
      • Sep 2019
      • 10409

      #3
      That's a lot of extras there Tony. Will join Mark on the front row!!

      ATB.

      Andrew

      Comment

      • Jim R
        SMF Supporters
        • Apr 2018
        • 15687
        • Jim
        • Shropshire

        #4
        Hi Tony
        A kit which has been through many brands. The aftermarket stuff will certainly raise the level of detail. I hope it all fits ok. I'll enjoy following your build.
        Jim

        Comment

        • flyjoe180
          SMF Supporters
          • Jan 2012
          • 12400
          • Joe
          • Earth

          #5
          I like the look of the Su22. Lots of extra goodies there Tony!

          Comment

          • yak face
            Moderator
            • Jun 2009
            • 13840
            • Tony
            • Sheffield

            #6
            Made a start on this the other day . Been test fitting the resin cockpit and it looks like it’ll fit without much work. All I had to do was cut off the nib on the top of the undercarriage bay and remove the locating tabs on the fuselage .Its now had a coat of blue grey and will be detailed next. The pic of the instructions shows how much the kit cockpit was lacking in detail. Another area Ive been looking at is the exhaust . The kit one is just a plain tube with a flame holder at the back end . The actual exhaust has a ridged rear section( a bit like an old corrugated iron shed roof ! , see pic ) and an adjustable nozzle .
            I used the kit tube section but cut off the end and will replace this with the exhaust from the Monogram Starfighter which was in the spares box. The ridged interior was solved by using a piece of wine foil cut to the correct length , scoring the ridges with a dotting pen and rolling up to form a cylinder and inserting in the kit tube.
            Click image for larger version

Name:	7D0452A7-0347-47B1-B0AD-B90D5742F567.jpeg
Views:	3
Size:	3.1 KB
ID:	1162918Click image for larger version

Name:	8872DB93-456B-4202-A8B8-B3899C30194C.jpeg
Views:	3
Size:	3.6 KB
ID:	1162919Click image for larger version

Name:	D92F2801-3F8C-42CB-8F7C-A2DD720D6C4D.jpeg
Views:	1
Size:	3.6 KB
ID:	1162920Click image for larger version

Name:	D5ED25B2-52F5-49C8-A739-9827E7E8B6E6.jpeg
Views:	3
Size:	4.0 KB
ID:	1162921Click image for larger version

Name:	6E27DABA-D796-4456-AD88-C3325A278357.jpeg
Views:	1
Size:	3.8 KB
ID:	1162922Click image for larger version

Name:	71C78886-40F6-4185-866D-4E7CE85156C8.jpeg
Views:	3
Size:	4.1 KB
ID:	1162923Click image for larger version

Name:	FDF35D7A-6B6C-4FB7-AC5C-FFF9DCE5EA2F.jpeg
Views:	3
Size:	3.8 KB
ID:	1162924Click image for larger version

Name:	6A6825F6-27F1-4676-9279-4EAAB3B3BCA6.jpeg
Views:	3
Size:	3.5 KB
ID:	1162925Click image for larger version

Name:	91AFD48B-904A-46E2-8080-1B276449CFDE.jpeg
Views:	2
Size:	4.0 KB
ID:	1162926Click image for larger version

Name:	4275D548-D9DB-4EC8-8821-4E64C8C34041.jpeg
Views:	1
Size:	3.9 KB
ID:	1162927Click image for larger version

Name:	897C4AFC-3917-4BFD-935E-AF4C63CEC4D5.jpeg
Views:	2
Size:	3.8 KB
ID:	1162928Click image for larger version

Name:	59E5FD2B-9BA8-4788-9C10-B649C5002589.jpeg
Views:	3
Size:	3.4 KB
ID:	1162929

            Comment

            • Jim R
              SMF Supporters
              • Apr 2018
              • 15687
              • Jim
              • Shropshire

              #7
              Hi Tony
              That has worked a real treat and you got to open a bottle of wine in the name of modelling accuracy. :thumb2: :smiling:
              Jim

              Comment

              • tr1ckey66
                SMF Supporters
                • Mar 2009
                • 3592

                #8
                Old progress Tony. The exhausts are a real improvement over the simplified kit parts.
                cheers
                Paul

                Comment

                • Mark1
                  • Apr 2021
                  • 4156

                  #9
                  Nice work on the exhaust and a good heads up for when I get round to doing mine,my starfighter came with two exhaust nozzles so I got that covered.

                  Comment

                  • Tim Marlow
                    SMF Supporters
                    • Apr 2018
                    • 18901
                    • Tim
                    • Somerset UK

                    #10
                    Excellent work on the exhaust Tony. Very worthwhile upgrade.

                    Comment

                    • JR
                      • May 2015
                      • 18273

                      #11
                      Wow that was some impressive scratchery.

                      Comment

                      • papa 695
                        Moderator
                        • May 2011
                        • 22770

                        #12
                        Just seen this one Tony, right up your street. And a fantastic start.

                        Comment

                        • adt70hk
                          SMF Supporters
                          • Sep 2019
                          • 10409

                          #13
                          Top notch work there!! Very well done.

                          Andrew

                          Comment

                          • yak face
                            Moderator
                            • Jun 2009
                            • 13840
                            • Tony
                            • Sheffield

                            #14
                            Test picClick image for larger version

Name:	D2B2B845-3E61-4B64-81C5-E724AAA5B332.jpeg
Views:	3
Size:	3.7 KB
ID:	1163085

                            Comment

                            • yak face
                              Moderator
                              • Jun 2009
                              • 13840
                              • Tony
                              • Sheffield

                              #15
                              Exhaust now done . I gave it a base coat of aluminium then a thinned light tan . The next step was out with the good old eye shadow . A metallic bronze/ brown was rubbed all over then a metallic blue added to the nozzle . The outside of the nozzle wont be seen once its in the fuselage so I didnt bother too much with that .Click image for larger version

Name:	B5E0A659-4602-4409-9CAD-C2C0E3509F40.jpeg
Views:	3
Size:	3.4 KB
ID:	1163090Click image for larger version

Name:	2B86F0A8-F752-49ED-8083-3129D4D8507E.jpeg
Views:	1
Size:	4.2 KB
ID:	1163091Click image for larger version

Name:	E9DE8C96-7F76-401E-886B-9E87C376984B.jpeg
Views:	3
Size:	3.1 KB
ID:	1163092Click image for larger version

Name:	B58117DF-045C-45F4-B2B8-9CC6A93373A4.jpeg
Views:	3
Size:	3.5 KB
ID:	1163093Click image for larger version

Name:	364FEA95-E9E0-498C-8C3D-3DF87B3B5893.jpeg
Views:	3
Size:	3.3 KB
ID:	1163094Click image for larger version

Name:	15ABFC77-9B18-42BA-8232-22AAF785BE37.jpeg
Views:	1
Size:	3.9 KB
ID:	1163095Click image for larger version

Name:	572E5659-3EEE-4BFD-93D8-144C4806AE80.jpeg
Views:	3
Size:	4.2 KB
ID:	1163096Click image for larger version

Name:	6E4C4B8A-451A-4D71-B9F1-178E4A225B0E.jpeg
Views:	3
Size:	3.5 KB
ID:	1163097

                              Comment

                              Working...