Sukhoi Su-27 Flanker B Trumpeter Scale 1:32
Collapse
X
-
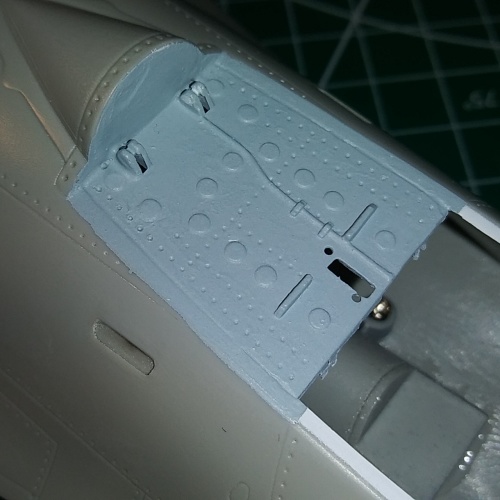
Another lesson last night, do not overspray!!!!!!
Used Stynylrez Acrylic Primer and it has to be airbrushed in a very tiny coat, wait and repeat.
After I over sprayed, I had to wipe it off (I was lucky it came off easily using wet paper towel and wet Q-Tip)
It seems to dry to a relatively hard surface; I will try tonight a light sanding at the edges where I masked.
Very good lesson and learned the hard way but I am happy to learn.Comment
-
And the fun goes on. :tongue-out3:
I do not know if anybody reads these comments/reflections/reports from a total newbie but in case anybody does, I will continue.
Maybe some new to the hobby can learn from my mistakes. :smiling:
Glued in main gear wells. Tried to make all even. Came out NOT TOO bad.
Finished painting by hand the top of the nose gear well, came out pretty god.
Painted by hand the back of the cockpit top and I did not like it.
I have read that Vallejo Air paint are very thin so no need to dilute.
I did not and it was too thick, the finish shows the brush strokes.
Probably, would be better off to thin it and paint 3 times or so.
I will gently sand it and spray it again, so much better finish when you airbrush. Amazing.
By the way, slightly sanded Stynylrez Acrylic Primer White primer and I totally love it.
I could sand it off so there is not step between primer and plastic, just super clean and smooth transition.
Thank you for advising it!
Now, question for my gurus.
When I glued the upper cockpit part to fuselage, glue went on the visible side of the cockpit (circled red) and dissolved the plastic causing the cavity.
It is already painted.
Can I use Tamiya putty to fill that cavity without sanding the paint off?
Have a great weekend!!!!
Comment
-
 Guest
Guest
People do, I’m fairly sure
My guess is that it showed the brush strokes because it’s so thin. Hand-painting anything bigger than few square millimetres often needs two coats, if not more, because the paint generally won’t cover in one attempt.
It does depend on the paint you use, though. Vallejo Model Air is not great for brush-painting exactly because it’s been pre-thinned for airbrushing, meaning it’s so thin it certainly won’t cover well. On the other hand, Vallejo Model Colour — that is, not the airbrush paint — covers much better when applied with a brush. The same applies to almost any other brand of paint that sells both airbrush-ready and non-airbrush paint. With other manufacturers, who don’t make this distinction, it varies a lot.
In general, though: if you see the paint hasn’t covered as much as you want, just wait for it to dry and add a second coat, which doesn’t need as much paint as the first anyway.
Almost certainly. Though you will need to sand down the primer and re-paint at least part of the area, of course.Comment
-
Usually brush strokes are caused by the paint being too thick, so not flowing out when brushed, or by it being over worked after it starts to dry. Once it starts skinning and pulling you need to let it dry. Agree about two to three thin coats though. A couple of coats of properly thinned paint are quicker and easier to apply than one thick coat anyway, and will give a much better finish. VJ model air sometimes needs thinning for brush painting, and always needs thinning for spraying in my experience.Comment
-
Thanks, Jakko! :smiling:People do, I’m fairly sure :smiling3:
My guess is that it showed the brush strokes because it’s so thin. Hand-painting anything bigger than few square millimetres often needs two coats, if not more, because the paint generally won’t cover in one attempt.
It does depend on the paint you use, though. Vallejo Model Air is not great for brush-painting exactly because it’s been pre-thinned for airbrushing, meaning it’s so thin it certainly won’t cover well. On the other hand, Vallejo Model Colour — that is, not the airbrush paint — covers much better when applied with a brush. The same applies to almost any other brand of paint that sells both airbrush-ready and non-airbrush paint. With other manufacturers, who don’t make this distinction, it varies a lot.
In general, though: if you see the paint hasn’t covered as much as you want, just wait for it to dry and add a second coat, which doesn’t need as much paint as the first anyway.
Almost certainly. Though you will need to sand down the primer and re-paint at least part of the area, of course.
Now I have two different theories, you say that brush strokes are because of paint is too thin and Tim says the opposite. :tongue-out3:
I guess it depends on few factors and the person who paints (read dummy me lol,lol).
Thanks for the hint on Vallejo Air versus Model Color.
Totally makes sense.
I think as my general rule will be, if I can airbrush I will and if not, I will buy the Vallejo Model Color for small parts.
About filling up with Tamiya putty, there is a little problem, this part of the cockpit is brush painted with Vallejo Air, primer is under.
I guess I need to sand off both, correct?
Thank God, there is plain surface there so I can sand as deep as needed but if there were rivets, it would not be that much fun.
Comment
-
Thanks, Tim.Usually brush strokes are caused by the paint being too thick, so not flowing out when brushed, or by it being over worked after it starts to dry. Once it starts skinning and pulling you need to let it dry. Agree about two to three thin coats though. A couple of coats of properly thinned paint are quicker and easier to apply than one thick coat anyway, and will give a much better finish. VJ model air sometimes needs thinning for brush painting, and always needs thinning for spraying in my experience.
I believe that in my case the paint was too thin and I was still working with strokes when it was getting dry.
Another lesson learned. :-)Comment
-
 Guest
Guest
Everybody does that at times Sometimes because you’re not paying enough attention, sometimes because the manufacturer hasn’t made it obvious at all which is the actual part and which bits need to be removed.
Comment
-
Here is the subject of our discussion. :-)Usually brush strokes are caused by the paint being too thick, so not flowing out when brushed, or by it being over worked after it starts to dry. Once it starts skinning and pulling you need to let it dry. Agree about two to three thin coats though. A couple of coats of properly thinned paint are quicker and easier to apply than one thick coat anyway, and will give a much better finish. VJ model air sometimes needs thinning for brush painting, and always needs thinning for spraying in my experience.

Comment
-
Doesn’t look that bad to me Andrzej. Perhaps a little thick, which has caused the slight dragging that’s visible. It will be fine under the canopy though.Comment
-
Thanks, Tim. :smiling:
Well, you already know canopy was broken and will have cracks, so it does not really matter.
I use this model build to just learn things and experiment. And have fun!!!! It is very important.
Comment
-
 Guest
Guest
Once you’ve learned more, you can always come back to the subject and build another one with your improved skills.Comment


Comment