If this is your first visit, be sure to
check out the FAQ by clicking the
link above. You may have to register
before you can post: click the register link above to proceed. To start viewing messages,
select the forum that you want to visit from the selection below.
Thanks Ian
She was special - a very loyal friend.
I have been studying the bonnet. Typically for this kit it ain't gonna work as the instructions suggest!!! The bonnet consists of 4 pieces.
[ATTACH]311970[/ATTACH]
These are supposed to be held together with metal hinges - way over size. They want the bonnet to fold like the real thing.
[ATTACH]311973[/ATTACH]
[ATTACH]311974[/ATTACH]
On the underside of the bonnet sections are 'lumps' which the instructions say to melt onto the hinge holes. Recipe for disaster!!
There are also loads of deep, round molding holes.
[ATTACH]311971[/ATTACH]
[ATTACH]311972[/ATTACH]
I will clean up each section. remove the lumps and fill the holes and then glue the 4 parts together. I will make the completed bonnet removable although not folding. At least that is the plan :tongue-out3:
Jim
Thanks Fernando. We do have nothing but good memories of Belle. She was a wonderful friend.
I have been working on the bonnet sections. All cleaned up and the blobs for the hinges sanded off. Sink marks filled. I also fitted some thin pieces of styrene sheet to help locate the sections. On the real car the hinge between the two top sections sticks up like this so I have made a false hinge.
(for ref only)
[ATTACH]312035[/ATTACH]
[ATTACH]312036[/ATTACH]
Jim
Hi all
Some good progress - just very slow as every part of this kit requires extra work. Not really difficult, quite enjoyable in fact, but time consuming.
Fitted the lower body to the chassis. Stuck the radiator in place. Made some floor mats, partly to look good but mainly to cover the holes where the chassis joined the body. The steering column is typical of this kit - too long. The wheel would be touching the drivers chest so it will need to be shortened. Chromed all the bits and pieces. Finished the folded tonneau cover.
[ATTACH]312321[/ATTACH]
[ATTACH]312322[/ATTACH]
[ATTACH]312320[/ATTACH]
[ATTACH]312323[/ATTACH]
It is actually not too far from the finish line. (famous last words!!)
Jim
Hi all
Thanks for your kind comments regarding Belle.
Really getting there now :thumb2: Upper body fitted. Dashboard and other bits and pieces glued in place. Home made rear pads fixed. I am not sure whether those rear pads were fitted to original vehicles or are just part of restoration. They do seem quite common on refurbished cars.
[ATTACH]312780[/ATTACH]
[ATTACH]312781[/ATTACH]
[ATTACH]312782[/ATTACH]
Had a quick look at how the bonnet fits. Looks like there may be problems so even at this stage it may end up as a shelf queen :sad:
Jim
Hi all Ian and John - thanks for the encouraging words.
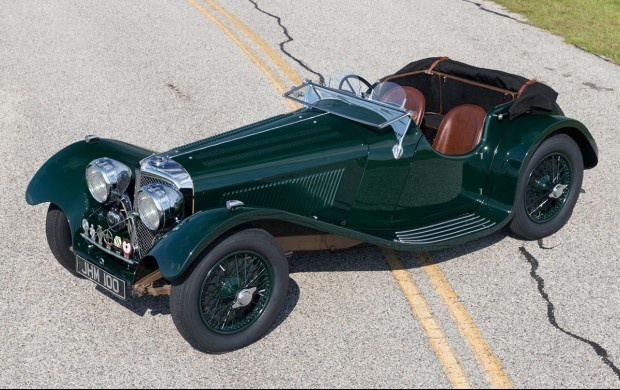
So I slept on it and did some thinking. Not something I do much!! :smiling4: Now the 1930s SS100 had a 4 piece bonnet which fitted snuggly between the chrome radiator and the scuttle. As in this reference photo.
[ATTACH]312838[/ATTACH]
The kit, have I mentioned that it is hopeless, provides a coil of thin, black plastic tube. This is fitted between the mudguards and the body as a seal. The real car had a similar seal there in the same way. The kit also tells you to run a length of this tube across the scuttle as in this picture from the side of the box.
[ATTACH]312837[/ATTACH]
Wrong, wrong, wrong!! That is why the bonnet sections don't fit without the tube. They are too short. Anyway I have used thin styrene to extend the front of the bonnet pieces. I wanted as smooth a join as possible so painted on Mr Surfacer 500 and sanded it back. Hopefully under primer and the green the join shouldn't be too noticeable. And they fit :smiling:. The white blob is a replacement rivet 'cause I got carried away and sanded off the original :worried:
[ATTACH]312834[/ATTACH]
[ATTACH]312835[/ATTACH]
I have also fitted the lights etc to the front and painted the number plates. Also made a GB decal for the plate on the other side. I have seen that in a few reference photos.
[ATTACH]312832[/ATTACH]
[ATTACH]312833[/ATTACH]
[ATTACH]312836[/ATTACH]
So we are another step closer to a finished model. Thanks for your continued support.
Jim


Comment