Outstanding Colin.

-
-
AWESOME!!
Wow, what an eye for detail. I really like what you are doing.
This makes me want to dive into my Revell made Bentley!Comment
-
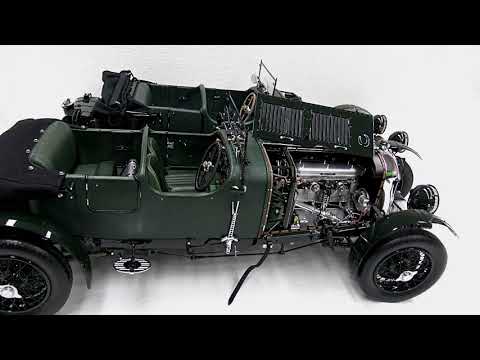
Airfix 1/12 4.5 Litre Bentley Blower Part 5
Radiator Dashboard and Snapped Front Wheel Axle Broken Spokes
So next up is the radiator the grill and the chrome surround 1st off painted the back grill black then tried using a template of the no 8 cut out to paint directly onto the grill this was a total disaster I’ve seen somebody do it on site on the web but I couldn’t match their skill so I’ve cheated and applied the decal again using several coats of microsol to make the decal bed down into the grills after this was achieved I then again hand painted over the number 8 to give a more realistic affect
Next came the dashboard this was painted in aluminium then all the dial facias were painted gloss black I also added an additional cylindrical switch near the top by again using a whittled down piece of a dowel this time and a small copper bead from a necklace to represent the nob this was also painted gloss black to match the rest of the dials
After this was dry I applied the decals to the clear plastic panel again using microsol to make them adheare to the plastic
Next I made up the body panels and painted them the same green as the rest of the car I was going to mat varnish it as the main body of the Bentley was made from ash coated with a resin to which the clothed exterior was added then dope was applied giving it a different texture the the metal of the rest of the car but Airfix in it’s wisdom or accident moulded these parts with a matt finish which when painted resembled what I was trying to achieve so I’ve left them unvarnished
In fitting the body panels in managed to snap off the drivers front wheel clever eh! oh well out with my favourite go to namely a tooth pick to which I fashioned out a new axle and in so doing when fitting it to the wheel managed to break a couple of spokes more toothpick whittling as you can see when painted they blended into the background along with the rest of the spokes
So as not to repeat the same happening again I’ve made my body panel detachable it has a false floor made from thick card painted black this whole unit then just rests on the chassis requiring no force to make it fit as previously which led to the broken axle to this the interior then slides into place and the whole thing is locked by the rear seat which also just pushes in
Not as it should be but as you can see from the photo I had gap issues requiring filler and sanding to resolve once I done the body panel wouldn’t attach to the correct points without splitting it seems the chassis is slightly to wide so that’s why I made up the false floor which is wide enough to allow everything to align without any undue force being applied
Finally with that resolved I moved to fitting the exhaust system basically 3 parts I also added some shielding mesh made from a piece of rolled around a ball pen flyscreen which was then slid onto the exhaust system before attaching to the chassis and finally adding the black undertray to the bottom of the car which in so doing snapped off another bracing strut on the side of the chassis like I said these are a particular weak spot on this model so with repaired I next moved onto the rear of the body panel and fitted the folding mechanism for the rear cover which I painted a slightly darker green to represent the green leather / tarpaulin it was made from and then suitably detailed the folding mechanism
Sorry folks no more pictures as the new server won’t accept them in their current state which now seems pointless continuing the posting without pictures to illustrate the wording
I will still keep a build diary and post it just to let you know how the build is progressing and any pitfalls that occur but apart from that not much else I can do
Ok after reading about file sizes on the forum I have reduced mine on the iPhone by emailing them to myself which gives you the choice of a reduced file size in some cases up to 90 percent smaller so the photos won’t have the resolution as before but at least I can still post them to illustrate my build texts see below I hope they are viewable they appear ok to me
Regards
Colin
[ATTACH]437968[/ATTACH][ATTACH]437969[/ATTACH][ATTACH]437970[/ATTACH][ATTACH]437971[/ATTACH][ATTACH]437972[/ATTACH][ATTACH]437973[/ATTACH][ATTACH]437974[/ATTACH][ATTACH]437975[/ATTACH][ATTACH]437976[/ATTACH][ATTACH]437977[/ATTACH][ATTACH]437978[/ATTACH][ATTACH]437979[/ATTACH][ATTACH]437980[/ATTACH][ATTACH]437981[/ATTACH][ATTACH]437982[/ATTACH][ATTACH]437983[/ATTACH][ATTACH]437984[/ATTACH]Comment
-
Looking good so far mate.Comment
-
Anybody looking for reference material for the Bentley blower be it Airfix or Revell should check out this video from you tube from Misko Models of Germany
Regards
ColinComment
-
Coming on very nicely indeed.
Well done.
AndrewComment
-
Airfix 1/12 4.5 Litre Bentley Blower Part 6
Steering wheel Spare Wheel and more linkages
Hello good afternoon from sunny Weston it is sunshine here at the moment quite pleasant
So what have I been up to this time well I’ve added some more linkages on the chassis from the handbrake to the front wheel drum and similarly add a small linkage from the rear of the handbrake assembled towards another fixing point on the chassis about an inch away
[ATTACH]438140[/ATTACH][ATTACH]438141[/ATTACH]
[ATTACH]438142[/ATTACH][ATTACH]438143[/ATTACH][ATTACH]438144[/ATTACH][ATTACH]438145[/ATTACH][ATTACH]438146[/ATTACH]
As you can see I also added the steering wheel suitably wrapped in cord to represent another modification used on the racing Bentleys namely to stop their hands from slipping on the polished wheels especially in wet weather I’ve also assembled the spare wheel took about 2 hours to wrap the cord around the steering wheel and 5 minutes to assemble the spare wheel
Still to be done are the windscreens the fly / bug guard the stone chip protectors for the headlamps horns and something completely missing from the kit is another stone guard over the left hand side front by the supercharger then the final piece will be to see if the bonnet panels fit along with the bonnet straps
Regards
ColinComment
-
Airfix 1/12 4.5 Litre Bentley Blower Part 7
I was hoping this would be the last build entry for this model sadly it cannot be I’ve had some issues namely the complete missing front offside Midgard stays so they had to be fashioned out of thick coated wire in fixing them to the chassis the front wheel parted company with the axle forcing another repair this is a warning to anyone building this kit this is one made from green black and aluminium coloured plastic the parts are extremely brittle unlike todays modern stuff and snaps at the mearest wrong pressure point when assembling if you are not very careful I also had to fashion the offside rear stays as well as they snapped attaching them to the chassis if I were advising anyone building this I would ignore the instructions on fixing the mudguards and preassemble them and the stays let them dry throughly probably overnight and the attach them to the chassis as one of the last jobs you do and make wedge from a piece of scrap wood or plastic nothing fancy just a piece like a wooden coffee stirrer is ideal make it the length of the height you want your stays to sit at then just wedge it in there this gives the stays the support they need whilst the glue sets and will prevent them from sagging during the glue setting time as they are only very thin pieces and with the weight of the mudguards on them causes them to bend somewhat it not supported during the glue setting phase well mine did that’s why I resorted to the wedges on top of the tyres as my lousy sketch shows
[ATTACH]438340[/ATTACH]
Next came the spare wheel another pia as you cannot see where the supporting arms are going mines on just but it’s not perfect by any means and remains a weak spot on the model and I see a piece of it has snapped off the right hand side see what I mean about brittleness
[ATTACH]438341[/ATTACH]
Finally I added the windscreen supports and started work on the stone guards for the lights I’m not using their supplied plastic discs as the look utter garbage I’m trying to fashion
something out of 1mm diameter steel mesh which has now arrived via eBay you can see my starting point for this in the photo showing the brass ring I’ve made I’ve also glued the horns to their respective supports ready to be mounted on the chassis
[ATTACH]438342[/ATTACH][ATTACH]438344[/ATTACH]
Regards
ColinComment
-
Your doing an excellent job with this. I run into this with my 50 year old ROCO models as they become more & more brittle with age.Comment
-
Airfix 1/12 4.5 Litre Bentley Blower Part 8 Nearly Finished
Well I was hoping to be able to say yes it’s finished but it’s not due to a delay on some mesh cutters not yet delivered apart from that it’s finished and I must say the fit between the bodywork and the bonnet covers is appalling but there’s nothing I can do now so will have to live with it
Anyway here’s what I have done added a scratch built stone guard for the supercharger on the left hand side couldn’t believe they missed that out
Next assembled the windscreen flyscreen I left it as it was as I couldn’t come up with anything better
Added the decals onto the sides using good old microsol to make them conform to the surface and when dry hand painted over the No 8 as with the front and rear I left the union jacks as they were but they are wrong ones a mirror image of the other which means the broad red stripe part of the flag is correct on one side and wrong on the other oh well
Next I painted the bonnet straps a deep Burgundy Red/Brown and highlighted the buckles in chrome using one of those liquid chrome pens but I just siphoned off a small amount onto a piece of plastic then painted it on using a brush
Afterwards the straps were attached to the bonnet covers ready for final fitting like I said previously my bonnet hinges were useless so I glued both sections together and joined them to each other by way of the straps and that’s it just the lights to add when the cutters arrive
I will the do a all round set of photos in the completed models forum after the lights have been added
I hope you have enjoyed this build with me and maybe some of my tricks and bodges will help somebody on their next build
Next project HMS Hood Amati 1/200 scale wooden frame and plank what have let myself in for 140 issues
Regards
Colin[ATTACH]438564[/ATTACH][ATTACH]438565[/ATTACH][ATTACH]438566[/ATTACH][ATTACH]438567[/ATTACH][ATTACH]438568[/ATTACH][ATTACH]438569[/ATTACH][ATTACH]438571[/ATTACH][ATTACH]438572[/ATTACH][ATTACH]438570[/ATTACH]Comment
-
Very nice work, looking very good.Comment
-
Great work. Very, very well done indeed.
Well outside my area of comfort.
ATB.
AndrewComment
-
Thanks for all the comments I appreciate them all my favourite bit is the bonnet straps they actually look like they are made out of leatherComment
-
This quite elderly kit is showing its age now as it was first produced in 1972 (I think) when compared to modern kits. Airfix have re released it a few times down the years. The older kits had a number of flat aluminium plated parts that are now just non-plated plastic in the latest re release. Airfix changed the number plate to one that is on a restored blower that now belongs to Bentley Motors, but did not correct the badge position on the radiator shell.
Having said that, the kit is capable of being detailed up to a much higher standard by the more dedicated modeller like the poster of this thread. Shapeless make 3D printed Hartford shock absorbers for this kit, but they are not really too difficult to replicate with plastic card.
The brilliant news is that Nick Edwards who has a website named Unobtainium is about to make 3D printed replacement engine and wire wheel kits for this kit. Look at his thread over on the Britmodeller website to see what he is up to.Comment
-
In my last post suffix should read Airfix.
There does not appear to be an edit function in the box for me to be able to easily correct my error.Comment


Comment