

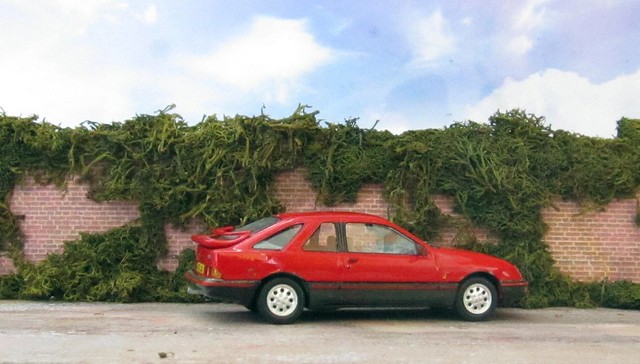
So here is the Sierra Xr4i then, resprayed in the original cardinal red colour.
A mammoth amount of work had to be done on this model to make it look like the real thing.
Surprisingly, when you consider the amount of work which had to be done, vanguards actually got the main body almost spot-on. By that I mean the wheel arches were a tad low (or exaggerated) hence using a swan morten blade I got rid of the excess and the wheels now show up nicely.
Vanguards have captured the jelly-mould style superbly IMO.
So all the changes then, gotta start somewhere so I'll start at the front...
- the front nose for it to fit flush needed the side edges filed/sanded so as to make it a bit smaller.
- as for the headlights, they were pretty poor; too thin and not pushed back far enough. On the real model I'm sure the nose would go over the headlights, eg if a new headlight lamp had to be put on you'd take the nose off? Well with the vanguards model the nose goes on first and then you place the headlight in, which didn't look good as headlight wasn't positioned behind nose so to speak and this showed. So the actual headlight lenses I've made are from thin acetate paper sitting behind nose, sanded slightly for hazy effect and touched up with black pen. Back of the nose was filed/sanded to make nose thinner so headlights not appearing to be positioned too far back and are slightly bigger than original vanguards version. The sockets behind lens needed drilling, and for the shine I've used boco kitchen foil, the inner lights blunted after being touched up by grey/black pens and outer lights purposely left untouched for the exaggerated shine from foil.
- as mentioned above, wheel arches corrected by getting rid of excess.
- what ruined the initial model mainly was the bumpers; all four were too big, very clumsy and not the correct shape, particularly the front bumper which had the most amount of work done to it. The side bumpers had to be reduced height-wise. The red strips were not thick enough hence corrected after a couple of layers of waterslide strips were added for each bumper.
- side indicator lights got rid of using dremel and replaced with slightly bigger more accurate looking one.
- the grille panel just below front window was initially too low so it was cut off from dashboard unit which it was attached to, and repositioned slightly higher.
- custom made wipers and numberplates to sync in with rest of collection.
- reason I didn't retain original reg number A123 SFB was because I got rid of sunroof as I fancied one without it! Not rear bootlid log missing.
 vanguards ford sierra xr4i resprayed red 1/5 by mg-ork, on Flickr
 vanguards ford sierra xr4i resprayed red 5/5 by mg-ork, on Flickr
 vanguards ford sierra xr4i resprayed red 3/5 by mg-ork, on Flickr
 vanguards ford sierra xr4i resprayed red 2/5 by mg-ork, on Flickr
 vanguards ford sierra xr4i resprayed red 4/5 by mg-ork, on
A mammoth amount of work had to be done on this model to make it look like the real thing.
Surprisingly, when you consider the amount of work which had to be done, vanguards actually got the main body almost spot-on. By that I mean the wheel arches were a tad low (or exaggerated) hence using a swan morten blade I got rid of the excess and the wheels now show up nicely.
Vanguards have captured the jelly-mould style superbly IMO.
So all the changes then, gotta start somewhere so I'll start at the front...
- the front nose for it to fit flush needed the side edges filed/sanded so as to make it a bit smaller.
- as for the headlights, they were pretty poor; too thin and not pushed back far enough. On the real model I'm sure the nose would go over the headlights, eg if a new headlight lamp had to be put on you'd take the nose off? Well with the vanguards model the nose goes on first and then you place the headlight in, which didn't look good as headlight wasn't positioned behind nose so to speak and this showed. So the actual headlight lenses I've made are from thin acetate paper sitting behind nose, sanded slightly for hazy effect and touched up with black pen. Back of the nose was filed/sanded to make nose thinner so headlights not appearing to be positioned too far back and are slightly bigger than original vanguards version. The sockets behind lens needed drilling, and for the shine I've used boco kitchen foil, the inner lights blunted after being touched up by grey/black pens and outer lights purposely left untouched for the exaggerated shine from foil.
- as mentioned above, wheel arches corrected by getting rid of excess.
- what ruined the initial model mainly was the bumpers; all four were too big, very clumsy and not the correct shape, particularly the front bumper which had the most amount of work done to it. The side bumpers had to be reduced height-wise. The red strips were not thick enough hence corrected after a couple of layers of waterslide strips were added for each bumper.
- side indicator lights got rid of using dremel and replaced with slightly bigger more accurate looking one.
- the grille panel just below front window was initially too low so it was cut off from dashboard unit which it was attached to, and repositioned slightly higher.
- custom made wipers and numberplates to sync in with rest of collection.
- reason I didn't retain original reg number A123 SFB was because I got rid of sunroof as I fancied one without it! Not rear bootlid log missing.
vanguards ford sierra xr4i resprayed red 1/5 by mg-ork, on Flickrvanguards ford sierra xr4i resprayed red 5/5 by mg-ork, on Flickrvanguards ford sierra xr4i resprayed red 3/5 by mg-ork, on Flickrvanguards ford sierra xr4i resprayed red 2/5 by mg-ork, on Flickrvanguards ford sierra xr4i resprayed red 4/5 by mg-ork, on


Comment