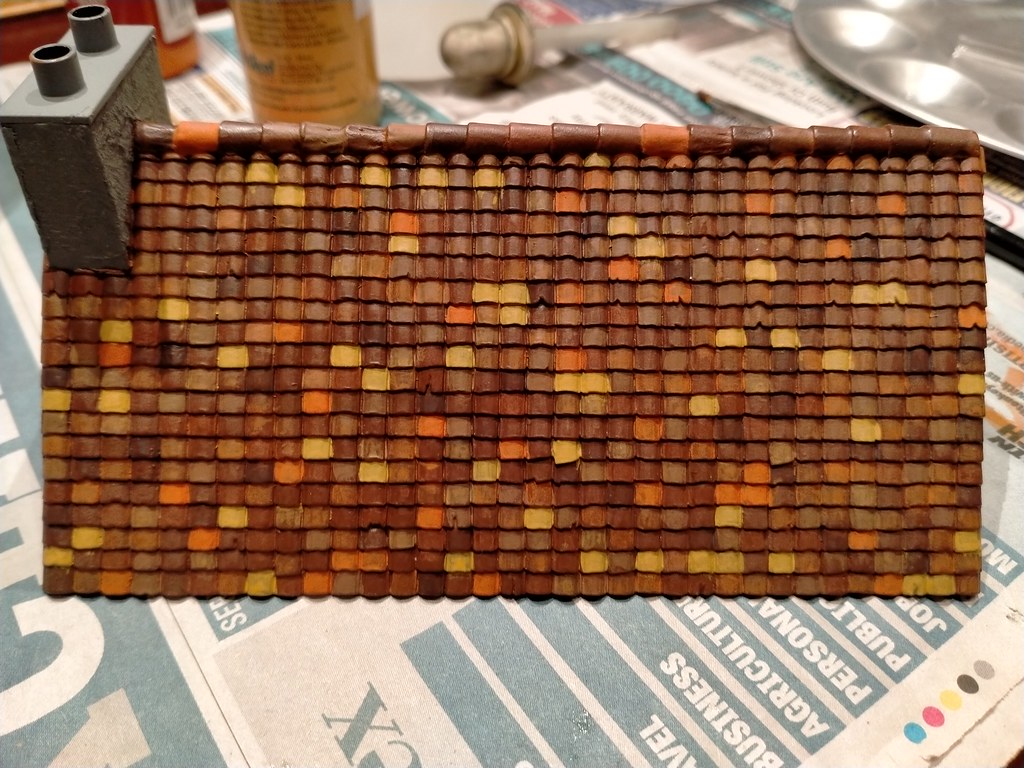
Looking good, take it that you'll be giving it a matt finish?
Andrew's resurrected 1/72 Armourfast Farmhouse....
Collapse
X
-
Thanks Jim. I really am very pleased with how it's gone since it's my first go at this sort of thing.
Gerry
Thanks for stopping by.
Indeed it will be getting a coat of Matt varnish. That slight sheen you can see was created Tamiya NATO Brown base coat. No idea why it did that.
It would be getting a Matt varnish coat anyway, even if it wasn't doing that, to protect it for our wargaming.
ATB.
AndrewComment
-
Good morning all
So I'm calling the roof done for the time being, until I paint the house and so can put it in a proper context. I can always make some adjustments later.
I had a bit of painting good fortune earlier this week. The brighter tile, painted a 'clay' colour still looked too bright at this scale so I gave it a thin coat of Vallejo 70.875 Beige Brown and was left with a nice faded terracotta looking colour - exactly was I was looking for....
So last night I painted a fair few tiles solidly in the clay colour and a dark yellow called 'antique gold' (non-metallic). The clay then got one or two coats of the Vallejo Beige Brown depending on the effect I was looking for. The antique gold got a thin coat or two of Humbrol enamel H113 rust. A few tiles then got a coat of the beige brown.
I have no idea how many tiles I've painted in the past week but bearing in mind some got as many as four coats, it was a lot.....
All in all as a first attempt I'm really very pleased with the effect and it was a surprisingly therapeutic process....nothing technical or difficult and the time went surprisingly quickly.
The phone camera still can't pick the colours correctly, so I'll try grabbing some better shots at the weekend.
ACW as usual.
Andrew
PS Apologies for the sheen on the Tamiya paint. No idea why it did that.....
------------------------------------------
The two bright colours unwashed........


The final effect....


Comment
-
-
-
Thanks guys. Maybe a bit darker overall than I was originally thinking but really pleased with how it turned out.
ATB.
AndrewComment
-
Good morning all.....again....
So having achieved such a good effect with the tiles, I'm going to experiment with the house walls.
When I first came back to the hobby my first online modelling friend was a man called Sean (aka vindicareassassin) - a couple of you will remember him from another site. He provided a lot of advice, some equipment and even kits to help get me started, including my first AB a Revell Vario bottom feed (0.7mm needle).
He kindly commented on the start of this build when I started it, nearly six years ago, and explained his technique for buildings. His technique was to spray all surfaces black at 45 degrees in the 'up' direction, then down at 45 degrees in white. So I thought why not.....
Below are a couple of examples of what he achieved, followed by my preshade. I used Vallejo Grey primer given that I don't have much white and it's a very light grey.
The kit he showed me is the 1/72 Airfix resin worskhop - remember this was done with a 0.7mm needle AB.....
ATB
Andrew
------------------------------------------------
Sean's workshop.
My attempt at the preshade.....I tried to graduate it a bit, so it goes lighter the lower you get - not completely successfully.....


Comment
-
-
Thanks Rick. Much appreciated.
To be honest I had forgotten about Sean's build. It was only when I went back and looked at the old thread that I was reminded of it, even then it took me a few days to realise what he meant about the angles. To honest if it doesn't quite work out it's not a biggie given what it's for.
ATB.
AndrewComment

Comment