Scale Model Shop

Collapse

Andrew and Junior's expanding foam hills

Collapse
This topic is closed.
X
X
 
  • Time
  • Show
Clear All
new posts
  • adt70hk
    SMF Supporters
    • Sep 2019
    • 10409

    #1

    Andrew and Junior's expanding foam hills

    Hi all

    So this is something that Si hinted at in a previous post.

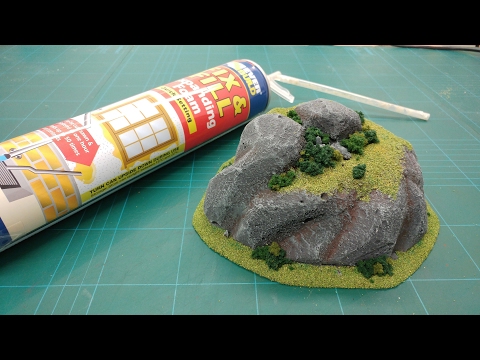
    This is another idea we got from the Terrain Tutor (link). Stylised hills/rocky outcrops for our battles - made from that expanding insulation foam you get in cans.

    Process is as follows:
    • Squirt out foam as desired.
    • Shape to your wishes and glue to a base.
    • Cover in polyfiller and grit to your taste.
    • Paint using kids or household paints - a base coat of dark grey following by 3 coats of dry brushing 3 different shades and colours.
    • Add flock and foliage to your taste.
    • Job done!

    What follows is Junior and I testing the theory. Obviously it's a unrealistic for NWE 44-45 but I think it has potential for more realistic ground in the future.

    ACW as usual.

    Andrew

    ---------------------------------------------------------------------

    How The Terrain Tutor does it


    Junior squirting out and the result once set:

    [ATTACH]356050[/ATTACH]

    [ATTACH]356052[/ATTACH]


    Our attempts in chronological order. The last one was almost entirely Junior's own work.

    [ATTACH]356053[/ATTACH]

    [ATTACH]356054[/ATTACH]

    [ATTACH]356055[/ATTACH]

    [ATTACH]356056[/ATTACH]

    [ATTACH]356057[/ATTACH]

    [ATTACH]356058[/ATTACH]

    [ATTACH]356059[/ATTACH]
    Attached Files
  • minitnkr
    Charter Rabble member
    • Apr 2018
    • 7532
    • Paul
    • Dayton, OH USA

    #2
    Cool idea & execution. PaulE

    Comment

    • Mini Me
      SMF Supporters
      • Jun 2018
      • 10711

      #3
      Watched the whole tutorial, way cool and filed away for future ref. Thanks for sharing!
      Rick H.

      Comment

      • SimonT
        • Apr 2018
        • 2824

        #4
        Interesting - will be trying that at some point

        Many years ago a chap at work gave me half a litre of the raw components for the foam (he was scratch building a large scale R/C torpedo boat and had filled the hull with the stuff)

        Never having seen the stuff in action (it was used on building sites but wasn't readily available like it is now) I mixed it together - it was like a scene from The Blob as it just kept on growing and growing :smiling5:

        Comment

        • adt70hk
          SMF Supporters
          • Sep 2019
          • 10409

          #5
          Originally posted by minitnkr
          Cool idea & execution. PaulE
          Thank you Paul. Much appreciated

          Originally posted by Mini Me
          Watched the whole tutorial, way cool and filed away for future ref. Thanks for sharing!
          Rick H.
          Originally posted by SimonT
          Interesting - will be trying that at some point

          Many years ago a chap at work gave me half a litre of the raw components for the foam (he was scratch building a large scale R/C torpedo boat and had filled the hull with the stuff)

          Never having seen the stuff in action (it was used on building sites but wasn't readily available like it is now) I mixed it together - it was like a scene from The Blob as it just kept on growing and growing :smiling5:
          Rick, Simon

          Thank you for the feedback, I'll let Junior know.

          Should you ever get around to trying it, in terms of using it, this is what I've learnt to far:
          • Cutting. Very easy to cut. Use a serrated knife though. Nothing fancy, kitchen knives are fine (mine are well over a decade old). The slope on the track was cut with a bread knife. Virtually no dust.
          • Sanding. Do it outside - HUGE amount of dust!!
          • Glue. Hot glue gun all the way. PVA does work but takes forever to dry.
          • Filler. Cheap stuff is fine. Use standard grade. The thick deep crack stuff it a bit hard to work and the thin fine crack stuff is not heavy enough.
          • Filler finish. Do not try and get a perfect finish on the first attempt. wait for it to partially set e.g. 15-30 minutes and go over it with very wet finger to smooth it down. You will get a much better finish and it will be less messy.
          • Grit. Having smoothed the filler down with a very wet finger it should be very damp (if not small pools of water forming). Now is the best time to grit, as it will sink in slightly and the filler will really grip it. It also saves having to wait for it to dry and then PVA it and wait for that to dry.


          Simon - how big did the 'blob' get??? I'd love to have seen it.

          Comment

          • SimonT
            • Apr 2018
            • 2824

            #6
            Roughly three foot long x foot and a bit wide and six inch or so high I think from memory

            Seem to remember some didn’t mix well and stayed a kind of sticky gooey lump

            Luckily on concrete garage floor so easy to chip off with a spade

            Good fun

            Comment

            Working...