Scale Model Shop

Collapse

Castle Diorama - Lizard enclousre

Collapse
X
 
  • Time
  • Show
Clear All
new posts
  • Tim Marlow
    SMF Supporters
    • Apr 2018
    • 18912
    • Tim
    • Somerset UK

    #16
    Hi Mike.
    Interesting project here…..First point though, don’t get disheartened….everyone goes through this process until they find a method that works for them. Several things to suggest here…..
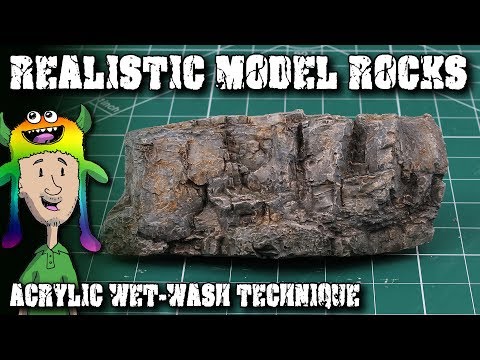
    Look at pictures of real rocks that illustrate what you are trying to achieve. This gives you a goal to aim at. Try to replicate what you see, not just what you think…..and you will probably see that, when dry, rocks are much lighter than you think….and they are not always grey….
    For making a successful colour wash with acrylic paint, you will need flow aid. Water has a high surface tension which can stop it flowing well as a wash. Flow aid breaks that down, enabling the wash to flow where you want. Just diluting the paint with water is not that effective in my opinion.
    Dry brushing acrylic paint is hard because it dries so quickly. For something this large I would use a big brush (in modelling terms) like a cheap 1/2 inch paintbrush, and household paint. Colour test pots are absolutely ideal for this, and are far cheaper than artist or model colours. House paint also dries slower than model colours and so is easier to dry brush with.
    Painting different rocks different colours, as suggested by Richard, is a good idea. However, I would mix my colours rather than buy different ones, and would always have one base colour used as a starter for the mixes in all cases. This will visually tie the colour scheme together and make it seem harmonious.
    Lastly, use you tube….there are some great communicators on there and you can see how it is actually done, rather than try to interpret written text. This guy is worth a look for starters….

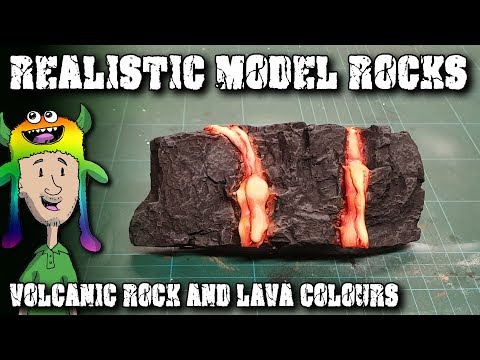
    The leopard spotting technique is another take on rock painting and may suit this better. I think Mel, in the video above, uses this technique ( I’ve seen him do this somewhere), but if not.. look it up. It gives great results….
    Lastly
    As always, have fun….you’ll get there despite the set backs….after all, if it all goes wrong you can simply put more paint on…..

    Comment

    • adt70hk
      SMF Supporters
      • Sep 2019
      • 10415

      #17
      Hi Mike

      Can only second what Tim says about the usefulness of Mel's video he's embedded.

      ATB.

      Andrew

      Comment

      • killwater
        • Apr 2022
        • 24

        #18
        First of all thank you all for the replies. Sorry for a weird format of my reply below but it helps me organize information, think and choose the viable solutions.
        I tried using different shades first for large areas, which looked pretty bad and currently I have black and charcoal stones which is better then the previous attempt but not really visible unless you look very closely.
        For drybrushing edges I mixed the grey separately for different areas to get different shades throughout - even less visible, probably not worth the extra effort.
        As a flow aid for washes I used a drop of washing liquid - it was recommended on some you tube videos about washes. Now I bought dishwasher rinse agent to be used for moulding the stone blocks - I could try to use that.
        Unfortunately I cannot use any other paint than non-toxic acrylic paint as this is the only one that is proven to be safe for lizards throughout the reptile keeping community.
        The only way forward I can see is to paint the cracks in black and add more shades of black.

        So I painted the cracks in black with the smallest brush I had and it did not work - the cutoff between the the crack and the flat surface is too visible and artificial.
        I will give it a black wash tomorrow as I have to repaint the whole level anyway.
        If that does not work I will try to add some more texture using grout and aluminum foil on one or two stones to see if this is the problem.
        If that fails as well I will repaint everyting with 3 or 4 shades of charcoal mixed with different quantities of black. Then drybrush the edges again in gray and probably settle for the result.

        As for the youtbe videos I probably spent more time watching than actually painting. This is the one I used as inspiration - looks super simple on the tutorial:
        <iframe width="560" height="315" src=" " title="YouTube video player" frameborder="0" allow="accelerometer; autoplay; clipboard-write; encrypted-media; gyroscope; picture-in-picture" allowfullscreen></iframe>
        Please notice though that the scale is completely different. I think two rocks are equal to the whole piece from the videos. For reference:
        Click image for larger version

Name:	IMG_20220503_215756.jpg
Views:	0
Size:	4.5 KB
ID:	1175190Click image for larger version

Name:	IMG_20220503_215715.jpg
Views:	0
Size:	6.1 KB
ID:	1175189

        Comment

        • rtfoe
          SMF Supporters
          • Apr 2018
          • 9088

          #19
          Hi Mike, if you keep using black as a base and wash you will get no where but a consistent flat coloured finish however you dilute or thicken the paint. Also if your surface is porous it will absorb all that wash. The grout should cover the cracks. Have you tried sealing the whole surface with PVA before painting?
          To be safe for reptiles I would have used drift wood for the base to simulate rock or slabs of dried tree bark that look like rock. Saves on painting and is natural. Everything needs to be pinned down or tacked with nail or wire as glue can be toxic unless you can get natural tree gum.

          Cheers,
          Richard

          Comment

          • Tim Marlow
            SMF Supporters
            • Apr 2018
            • 18912
            • Tim
            • Somerset UK

            #20
            That last shot looks like you are making progress Mike. Richard is probably right about porosity and your wash, but there are ways around that as well….
            Try pre-wetting the surface first by painting it with clean water. Once the area is wet, paint in any deep cracks with dilute paint. You want the paint to be like a heavy wash, not like thin paint (if that makes any sense). The pre-wetted area should allow the paint to diffuse into the surface water at the edges of the stroke, so minimising the hard lines you have been getting before. The water will also stop the substrate soaking up the paint like a sponge.
            As to the dry brushing, start with an intermediate shade, not too light, and use the brush slightly wetter so it deposits more paint. This is called overbrushing, or wet brushing, by some people. Once that paint is dry, use a lighter shade on a dryer brush, to bring out shapes and textures. Follow that with a lighter shade still, again on a dryer brush, repeating the sequence until you get the effect you are after. On something that size you really need to be using a quarter inch flat paintbrush or it will take forever….

            Comment

            • rtfoe
              SMF Supporters
              • Apr 2018
              • 9088

              #21
              Hi Mike, Tim has explained it as clear as can be on the process. I might add that for the size of those rocks and the life size of the lizards I'd use one inch to two inch brushes for the dry brushing. I realise that this isn't really miniature until you work on the castle.

              Cheers,
              Richard

              Comment

              • killwater
                • Apr 2022
                • 24

                #22
                So... I added some shades to rocks at random - in total I have 4 different greys and black. Black wash around lava river is still to be done - I will use the technique you guys suggested: wet the rocks, add a bit of black paint and then spread it around.
                Click image for larger version

Name:	IMG_20220505_204332.jpg
Views:	0
Size:	6.2 KB
ID:	1175320Click image for larger version

Name:	IMG_20220505_204423.jpg
Views:	0
Size:	6.1 KB
ID:	1175321
                Also I tested adding more texture to one of the rocks and it made a massive difference. The type of texture is wrong (as it was a quick test with aluminum foil) but it behaves exactly as on the tutorials when being painted - the conclusion is that the large flat surfaces are making it looking weird. I think I got wrong the ratio between the model and rock sizes. I would make them roughly half the size If I were to start from scratch. I am going to have to take a hit on this aspect. I will add some other elements and then reevaluate if the rocks need to to be redone.
                Click image for larger version

Name:	IMG_20220505_203730.jpg
Views:	0
Size:	5.5 KB
ID:	1175319
                Next step is test casting of stone blocks and lava river. I think I have the blocks covered (everything is easy until you actually try to do it...) - I am looking for this style to get a nice contrast with the rocks:

                Click image for larger version

Name:	1651781199516.png
Views:	0
Size:	22.4 KB
ID:	1175322

                Blocks will be casted with hard casting plaster with addition of buff powder pigment then weathered with sand and powder pigment (probably black and burnt ochre). Can I use acrylic paint instead of buff powder pigment (added to the plaster before casting)? I am also afraid buff will have to much red tint but we will see.

                Now with the lava river I would really appreaciete some more help. The plan is to have programmable LED's iluminating it from below (electronics I can cover easily). I have matt perspex installed already:
                Click image for larger version

Name:	IMG_20220505_211739.jpg
Views:	0
Size:	4.9 KB
ID:	1175323
                Next I would like to use some base layer about 5mm thick. It should diffuse the light outside of the perspex but not cause too much of a loss to the intensity. On top of it I will put red glass chippings for textrue and color. Then I would like to cover it with epoxy resin.
                I was thinking about using acrylic structural gel from The Range for the base but I have no idea if it will be suitable. I do not even know if it cures transparent or translucent. Other ideas were silicone and hot glue. Hot glue is roughly the transparency I think I should use but applying it to such a big area in relatively uniform manner is not an easy task. I could also mix the resin with someting that would make it translucent. The resin itself should probably be not self leveling as I think the bumps from glass chippings will look much better than flat surface. Would it be possible to just use the structural gel? I would appreciate any suggestions.

                Thanks
                Michal

                Comment

                • Tim Marlow
                  SMF Supporters
                  • Apr 2018
                  • 18912
                  • Tim
                  • Somerset UK

                  #23
                  Not sure about your last questions regarding the lava river I’m afraid. It’s not anything I’ve done before. However, you can certainly use paint in with the plaster to colour it. If you use dental plaster you will get sharper (and stronger) results as well. I would certainly weather with paint. Pigment could migrate to the lizard and cause toxicity issues.
                  Considering the use you want to put this to though, I would think seriously about the toxicity of some of the things you have suggested for the lava. Silicon sealer gives off acetic acid vapour as it dries, and I’m not sure if this will continue long after it has set. It’s not an issue for humans, but lizards are smaller, so will have a far lower tolerance. They will also be closer to the surface gassing this stuff off. Hot glue may be better, but I really don‘t know enough about it.

                  Comment

                  • killwater
                    • Apr 2022
                    • 24

                    #24
                    Thank you Tim for the reply.
                    In regards to the silicone I am using one that is used for aquariums for all applications requiring adhesives - this is widely used practice in the reptile hobby. In general if it is safe for fish it is safe for reptiles as water would work as transfer medium and fish are way more delicate. On the pigments - all parts made of plaster have to be sealed with transparent PVA glue that is approved for children use.
                    The problem with the lava river is I have absolutly no experience with the materials required (apart from resins in structural applications) as well. The plan for the lava river is as follows:
                    Click image for larger version

Name:	1651851694539.png
Views:	0
Size:	15.2 KB
ID:	1175362

                    River is 0.8m long, 0.1m wide on avarage and 0.025m deep. This gives a rough volume of 2l. Half of that would be glass chips.
                    Click image for larger version

Name:	IMG_20220506_170259.jpg
Views:	0
Size:	3.9 KB
ID:	1175363

                    Looking at the photo it would be probably sufficient to just cover it with tinted epoxy, but would be great to hear from someone with experience in this field.
                    In regards to stone blocks I casted the first batch yesterday with 20:1 plaster to buff powder pigment. They seem a bit to white (a bit less in reality than on the photo) so I would need to half the ratio on next pour. Also corners are missing on some of them. I also need to try the next batch with ivory paint.
                    Tim Marlow could you please point me to more information on how to weather them with acrylic paint? Would save me buying powdered pigments for weathering.

                    Click image for larger version

Name:	IMG_20220506_072833.jpg
Views:	0
Size:	3.8 KB
ID:	1175364

                    Comment

                    • killwater
                      • Apr 2022
                      • 24

                      #25
                      Also I think I found the missing step on the big flat rock surfaces - once the grout is applied let it dry for 10 minutes or so and then add texture by carving with a sharp screwdriver or small metal brush. too late for me but mabe it will help someone.

                      Comment

                      • Tim Marlow
                        SMF Supporters
                        • Apr 2018
                        • 18912
                        • Tim
                        • Somerset UK

                        #26
                        Weathering something like this with acrylic paint I would again pre wet the surface, and then “spot” the areas with very dilute paint (coloured water really) to tint the area. I would use several colours and overlap the spots to allow them to diffuse into each other and avoid hard colour transitions. Build up the effect slowly over several sessions. Make up the dilute paint in one container and transfer it to another one for use. This should avoid you inadvertently transferring lumps of unmixed paint and spoiling the effect.
                        Best hint I can give about actual colours to use is to look at a picture of real rocks (that show the effect you are trying to achieve) and just copy what you see.

                        Comment

                        • killwater
                          • Apr 2022
                          • 24

                          #27
                          Progress update. I casted quite a few blocks and sills, added black wash around lava river (as outlined by Tim - thank you), painted lava river base and constructed the tunnel in tower gate.
                          Couple of comments:
                          1. Budget constrains are starting to be an issue. The tunnel wieghts 200g which is quite scary if one takes into account it is probably just 0.5% of the whole castle. Lava river is going to be very expensive - probably about 30GBP.
                          2. When constructing the tunnel I should have used a mesh before applying grout to the top (like in reinforced concrete) - it breaks easily in tension. There are bigger gaps visible in the areas where it broke. Also it would make it 25% lighter as much less grout can be used.
                          3. For the tunnel I positioned the blocks with biggest face out which was probably not such a good idea as they are the same height now and too uniform.
                          4. The gaps between blocks were pointed using grout using the same techinque as when tiling.
                          5. The blocks have too much red tint comparing to the reference I have shown before. I used 20:4 mix plaster to buff. I should probably stick to the range 20:1-20:2 and add a bit of black paint. I will also try casting with ivory acrylic paint instead.

                          Next steps:
                          1. Weather the tunnel stone blocks. Not sure what colours to use and in what order. Any suggestions?
                          2. Cast some grey stones to pave the tunnel. A casting trial with grout is in order but I am afriad the texture will not be visible.
                          3. Cut the tunel length to cardboard template face as it sticks out. This is quite a challege as it is easy to push the blocks out. I think rotary tool will be the best bet.
                          4. Start building the front face of the central tower. The plan is to use bigger stones cut from sills on the bottom, corners and around the tunnel entrance and then fill with the small ones.

                          rtfoe
                          What have you used for as water in the waterfall diorama you used as example for rock painting?

                          As always any constuctive criticism will be much appreaciated.
                          Click image for larger version

Name:	IMG_20220514_082406.jpg
Views:	0
Size:	5.1 KB
ID:	1175886Click image for larger version

Name:	IMG_20220514_082417.jpg
Views:	0
Size:	5.8 KB
ID:	1175887Click image for larger version

Name:	IMG_20220514_082446.jpg
Views:	0
Size:	5.1 KB
ID:	1175888

                          Click image for larger version

Name:	IMG_20220514_103324.jpg
Views:	0
Size:	5.3 KB
ID:	1175890

                          Comment

                          • rtfoe
                            SMF Supporters
                            • Apr 2018
                            • 9088

                            #28
                            The painted lava flow looks good. I used a two part clear resin and hardener...the slow curing kind that takes about 24 hours to cure. The long curing process gives you a longer work time and lets all bubbles rise to the surface to be burst with a lighter or incense sticks. The resin mixture alone will leave a glass finish...ripples are done using Modge Podge.
                            There are some videos on youtube that show you how to work with resin.

                            Cheers,
                            Richard

                            Comment

                            • killwater
                              • Apr 2022
                              • 24

                              #29
                              Just a quick photo update. I had to rebuild it three times as it has been to distorted. For the rest I am going to use lego bricks knockoff to get the angles right. Also the resin should be coming on the weekend so the lava river should finally progress.

                              Click image for larger version

Name:	IMG_20220609_200206.jpg
Views:	0
Size:	3.4 KB
ID:	1177415

                              Comment

                              • Tim Marlow
                                SMF Supporters
                                • Apr 2018
                                • 18912
                                • Tim
                                • Somerset UK

                                #30
                                Glad you are still going with this Mike. Tower is looking really good.

                                Comment

                                Working...