Scale Model Shop

Collapse

Italeri 1:56 M4 Sherman

Collapse
This topic is closed.
X
X
 
  • Time
  • Show
Clear All
new posts
  • Gauge1TrainsDK
    • Mar 2017
    • 407

    #1

    Italeri 1:56 M4 Sherman

    Hi everyone

    I'd like to participate in this group build with the Italeri 1:56 M4 Sherman kit, made in so-called "hard plastic" for the Bolt Action WWII miniatures game, published by Warlord Games.

    As you can see from the images below, the kit has very few parts. It will require a moderate amount of cleanup, but the advantage of the harder make of plastic, aside from it being better suited for wargaming purposes, is that you can be just a little bit more direct when sanding, even with smaller or thinner parts.

    The build itself is not going to be much of challenge, except for maybe the turret, which comes in two parts and I expect will require some filling and extra sanding.

    What's more likely to be interesting (for me, at least) is painting and weathering it. The pigments etc. have to stick pretty well, because the model will obviously be handled when played with.

    I also get yet another chance of using the new and really neat Vallejo mud (thin/thick) products, which have been a joy to work with so far. Saves a lot of time from having to mix it yourself, and it's just my thing to be able to fiddle around with mud cakes on me models :-)

    Looking forward to seeing other people's more complicated builds!

    Any Dragon or Trumpeter fans out there? ;-)


    Kind regards from Copenhagen!


    [ATTACH]278342[/ATTACH] [ATTACH]278343[/ATTACH] [ATTACH]278344[/ATTACH] [ATTACH]278345[/ATTACH] [ATTACH]278346[/ATTACH]
    Attached Files
  • Guest

    #2
    Have fun with the build and making mud pies

    Comment

    • Gauge1TrainsDK
      • Mar 2017
      • 407

      #3
      Originally posted by Morpheus
      Have fun with the build and making mud pies
      Thanks - I can mail you a few mud pies, if you like

      Comment

      • monica
        • Oct 2013
        • 15169

        #4
        looks a nice kit,Christian,will be watching this one,

        Comment

        • Gauge1TrainsDK
          • Mar 2017
          • 407

          #5
          The kit parts are cut from the sprues, sanded, and hopefully ready for painting.

          90 % of the parts had no or almost no flash or mold lines. This holds true for the four track parts, the lower and upper hull parts, the two turret parts, and generally hatches, and the two large pre-molded wheel sections.

          The machine gun, barrels, antenna, and box-like parts had mold lines, and a modest amount of flash, but nothing major. Revell kits can be far worse!

          The tracks came in four parts, two upper and two lower. As the dry fit images below should almost attest, pressing them together whilst the glue dries should provide a convincing assembly. I am kind of curious to see if I can do that, but it is certainly possible.

          It remains to be seen if the seam at the bottom of the turret will be visible once the quite dark Olive Drab spray paint (Tamiya, in this case) is put on. If I can do without filling, perhaps covering up with weathering instead, I will usually do that for wargame miniatures, as they are not meant to be displayed as such, but should look cool at simply a little bit more than a glance, I think. If the tank was going on a rail car, as will be the case with my 1:35 scale military and other kits (civilian cars, containers, helicopters, etc.), I would have chosen to use filler straight away.

          The front lamps (placed on the ... "glacis"?) on the Sherman are the worst quality parts. The round bars going around the lamps are connected to the lamps by internal flash, which is not practically removable without destroying the bars. This would certainly have been done properly on a 1:35 kit, and I would hope also a 1:48. The bars ought to have been cast as separate parts.

          The instructions made by Warlord Games (I believe) for this Tamiya kit are exceptionally poor, especially considering the kit only has 7 or 8 overall steps, and each step consisting of between 4 to 10 parts being put together. There are no "walk lines" to show exactly where a part is supposed to go, or which way it is supposed to turn, etc. This information is instead pieced together by dry fitting, and looking at the box images. Lousy.

          All in all, I think I spent between 90 and 150 minutes getting ready for painting the parts.

          It was highly enjoyable, and a very easy build, despite the manual and the two lamps which were the only two real downsides, and nothing to make it unpleasurable.

          For anyone who enjoys painting and weathering, more than cutting, sanding, filling, and gluing: this type of kit is for you. And you can even use them for wargaming afterwards without breaking off tiny parts - this is another area where the so-called "hard plastic" shows its advantages ;-)

          If you would like me to post zoom-ins of particular parts, just let me know.


          Kind regards to everyone!

          Christian

          [ATTACH]279353[/ATTACH] [ATTACH]279354[/ATTACH] [ATTACH]279355[/ATTACH] [ATTACH]279356[/ATTACH] [ATTACH]279357[/ATTACH] [ATTACH]279358[/ATTACH] [ATTACH]279359[/ATTACH] [ATTACH]279360[/ATTACH] [ATTACH]279361[/ATTACH]
          Attached Files

          Comment

          • monica
            • Oct 2013
            • 15169

            #6
            nice start to this one,looking good so far,

            Comment

            • Gauge1TrainsDK
              • Mar 2017
              • 407

              #7
              Originally posted by monica
              nice start to this one,looking good so far,
              Thank you

              If anyone has a kid, I do believe this kind of kit would be a good place to start them on modelling, it's so easy and still offers the possibility to go nuts with accessories (not what I plan to do), painting, and weathering (something I will go into, to improve).

              Comment

              • Gauge1TrainsDK
                • Mar 2017
                • 407

                #8
                Spray painting done. Colours used are:

                Tamiya Olive Drab (TS-8 I think, but let me know if you want it).
                Army Painter Matt Black
                Plastic Soldier Army Spray British Khaki (I think, or "English Uniform")
                Army Painter Gun Metal

                Unfortunately, the seam on bottom of the turret is very visible, but rather than fill, sand and repaint, I prefer to weather it away. There is actually a part where the seam has disappeared, which is where I sanded the most and thereby removed more material.

                Brush painting is next. Nice to have an easy build like this the same time as a Dragon kit [ATTACH]279508[/ATTACH] [ATTACH]279509[/ATTACH] [ATTACH]279510[/ATTACH] [ATTACH]279511[/ATTACH] [ATTACH]279512[/ATTACH]
                Attached Files

                Comment

                • Gauge1TrainsDK
                  • Mar 2017
                  • 407

                  #9
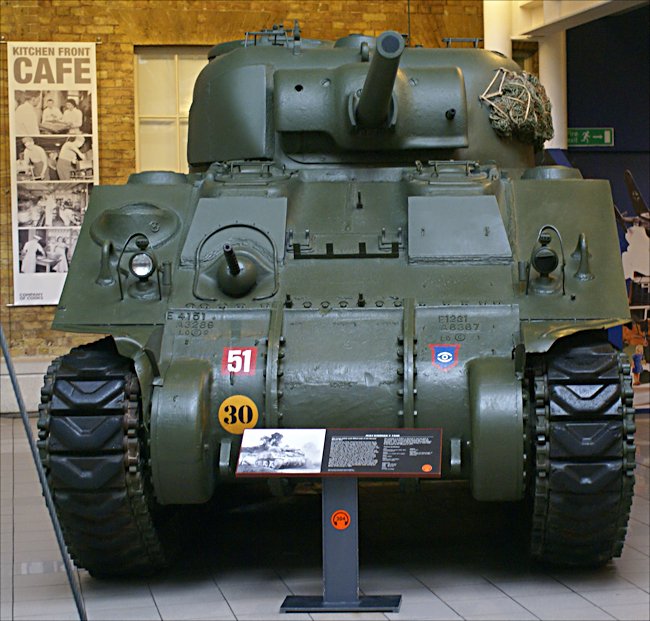
                  Been "finishing" up a Dragon 6102 Hanomag (felt like I needed the project to be in a sufficiently complete state!), but now the painting of the 1:56 M4 Sherman is done, and British decals put on, based on museum pictiures found here:

                  You can see this Sherman M4A4 75mm gun British Medium Tank at the Imperial War Museum, Lambeth Road, London SE1 6HZ.


                  ...and scrolling down the page, I found pictures of the back of the Sherman, too. Much better than the outtakes found via Google image search. So, be right back

                  Looking forward to reading through your builds, everybody!

                  In case the Hanomag or Dragon kits are an interesting subject to you, feel free to look at my first attempt at a Dragon kit here (and try not to laugh too hard): https://www.scalemates.com/profiles/...ms&album=33366

                  [ATTACH]280623[/ATTACH] [ATTACH]280624[/ATTACH] [ATTACH]280625[/ATTACH] [ATTACH]280626[/ATTACH] [ATTACH]280627[/ATTACH] [ATTACH]280628[/ATTACH]
                  Attached Files

                  Comment

                  • Gauge1TrainsDK
                    • Mar 2017
                    • 407

                    #10
                    There we go, all ready for weathering [ATTACH]280647[/ATTACH]
                    Attached Files

                    Comment

                    • col68
                      • Nov 2016
                      • 1505

                      #11
                      Nice build Christian

                      Comment

                      • Gauge1TrainsDK
                        • Mar 2017
                        • 407

                        #12
                        Originally posted by col68
                        Nice build Christian
                        Thanks! It's fun, and relaxing in between Dragon builds!

                        Comment

                        • Gauge1TrainsDK
                          • Mar 2017
                          • 407

                          #13
                          Unfortunately, I took low-res pictures tonight of the wash, rust and chipping effects. Will see if I can't upload something better in the coming days. I apologise for the low quality of this pot. Happy building, everyone!

                          [ATTACH]282560[/ATTACH] [ATTACH]282561[/ATTACH]
                          Attached Files

                          Comment

                          • Guest

                            #14
                            Yep!!! Waiting for those photos....

                            Comment

                            • Gauge1TrainsDK
                              • Mar 2017
                              • 407

                              #15
                              Thanks :-) Sharper pics down below.

                              [ATTACH]282666[/ATTACH] [ATTACH]282667[/ATTACH] [ATTACH]282668[/ATTACH] [ATTACH]282669[/ATTACH]
                              Attached Files

                              Comment

                              Working...