Just use real twigs you should be able to use the tips of the small branches for 1/35 Jens

-
-
I was out earlier trying to do this but that's when I went for the grass instead since they were straighter than the tips of my hazel trees... Perhaps I should have another look?
All the pictures I've seen of real fascines are made out of thinner sticks and this is what I want to recreate.

Almost all the trees, shrubs and vegetation in my garden are of a non-straight variety. I didn't think of scale modelling when I planted the things I planted 10 years ago, and they certainly didn't think of this when they build the farm in 1887.
Future owners of this place will have more scale model friendly plants, trees and shrubs to utilise when I'm dead
I'll have another look in the garden now but if I can't find suitable material I'll pick up a cheap broom later when I'm buying plaster for the base I'm building later today.
I really want to finish the model so I can start a new one tonight! (or pick one from the table of shame to be honest... I've promised myself to do half of them before starting a new kit.)Comment
-
Your probably right a bask broom head cut should work better, or one of the type the witches use.Comment
-
I agree with the witches broom bristles! Halloween coming up too so won't be hard to find one
Comment
-
That's exactly the type of broom I planned to scavenge, but do you think you can buy brooms all made out of natural materials today?
Not here anyway, only piassava brooms. You know, the one with red bristles...
I'm not giving up that easy - plus I bought plaster, brown paint and some sort of arts 'n craft punch for making cute little leaves... I worked out how to make it make leaves suitable for 1/35 scale so it was a bargain at £2.50!
I'm going to raid another flower pot tonight and mix it with PVA to use it on the base for the Mk.IV. Need to cut some wood first though...
Lot's of work to properly finish a model apparently but I hope it turns out ok...?
First a couple of ham shanks in a big pot with bay and allspice and then wait 2.5 hours! Fuel for late night modelling!
Comment
-
Great work Jens, you certainly can be proud of this one
Jim
Comment
-
Excellent build and finish Jens
Comment
-
Cheers guys!!!
Last night "working on your own" sadly got a new meaning when I slipped with my scalpel, with a brand new blade, and plunged it right into a finger on the left hand and created a bit of a mess before I was able to close the wound, clean it and grab a bottle of CA glue to "stitch" it up...
After cleaning up the mess it was pointless to continue working on the base since the cut finger was pretty useless from all the CA glue on it so no progress sadly.
Have failed to find a suitable broom today too so no fascine either.
Had an interesting idea though for a different base during this creative break and I'm now searching for a glass dome like this one below.
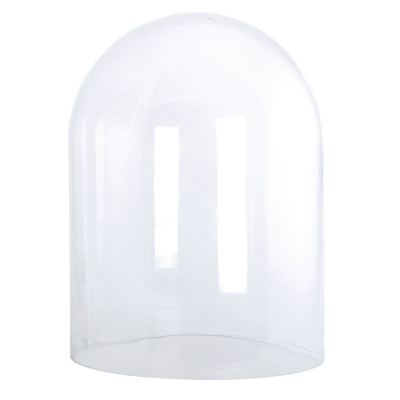
It would look interesting if I make a round wooden base and a raised piece of terrain on the base, like a small mound/hill, and place the model on top and put the glass dome back, on top of everything.
It would both protect the model, and add flair to the miniature "diorama" effect.
The domes I've found so far are silly expensive, but I like the idea so I will continue to look!
I'm sure they manufacture these domes for little money and then they are re-branded and marked up at interior decoration firms - where I found this one for £70.
If you know other cheaper sources for such glass domes, or plastic too, I'm all ears!
Cheers,
JensComment
-
Broom finally found so the fascine is now on track again!
Damn it was hard to find...
I've also finally started to build a small vignette to finish the build but I'm way outside my comfort zone here because this is really the first time I've done something like this!
The plan is to have the tank parked on top a small slope/mound, just like all the old WWI pictures you see of Mk.I and Mk.IV tanks, but I wanted the slope to be part of an old trench, or fortification - just to give it more life and purpose.
The base is just a piece of MDF and after some thinking (a lot of thinking to be honest, perhaps too much?) I hot glued some EVA foam to the base and then mixed some plaster with brown paint and some PVA glue to hopefully make it a bit sturdier for the future. This was just improvisation and I've got no idea if it'll work or not...
I've just added some earth to it as well from an old dead flower pot that I found, mixed with some water and PVA and then tried to "sculpt" a base layer.
When I was sort of happy, or at least felt it was enough for the first layer, I mixed more PVA with water and almost flooded the earth just to make it solid, and I soaked up all the extra glue with some kitchen paper.
Perhaps I should've watched some solid tutorials first but the ones I've seen all contradict each other so I improvised as usual and just went for it.
I hope it looks ok in a few hours when it's started to cure...
Here are some pictures whilst doing it. Please comment with tips, suggestions or something I've done wrong because the base can easily be redone, although I'm kinda pleased with how the boards turned out.


I've tried to make it like the boards are caving in from the pressure above. It's also going to look abandoned and not being an active trench.
It's also just going to be some sort of outer feature of a trench so no well maintained floor.
I might add some grass to the model depending how it turns out? The tank is pretty muddy so I'm going to (try to) make it look a bit "wet" and muddy.
It needs a few more features to create interest for the whole base but that's still unknown. I might add something related to trenches like barbed wire and sand bags?
We shall see!
I did enjoy playing with balsa wood again! Haven't done so since I was building air planes as a teenager and a lot of old memories came back
Cheers!Comment
-
Really nice work mate! Looks like the diorama building is going to come very natural to you. The trench boards look really good. And you can't beat getting messy with the mud/pva mix
Comment
-
That tank is absolutely flippin' marvellous.Comment
-
Great work with the base Jens, looking very good and life like.Comment
-
I do a section at the time but I just brush on a little odorless thinner with a wide brush, just to make it a bit damp and then add the first grime colour and blend it vertically with another smaller brush. Let it dry for a bit and then on it again with the same grime until happy and then move on to a different tone. In all I used three different "grimes" on this model if I can remember it correctly?
I don't use any water at all, only odorless thinner. AMMO by Mig brand thinner. Vallejo grimes, oil effect and pigments.
It's easier to work a small segment at the time and don't move on until you're happy. I've been practising on plastic bottles until I got the hang of it but I find it easiest to do a little every time and blend it until very little is left, and then do it again in layers. That way it's easier to control and easier to stop in time. In my case luck was also part of it I think...
Edit: Come to think of it I used Vallejo streaking grime and streaking rust in combination on this model, and a bit of oil effects/streaking oil on axels and other "oily" parts. Thin layers and many of them. Worked surprisingly well on the XF-49 Khaki base colour!
Edit 2: If I'm not making any sense it's because I'm almost asleep and fighting to keep my eyes open...Comment
-
Perfect sense Jens. I now might be tempted to try a few other types. Thanks.Comment

Comment