Scale Model Shop

Collapse

Takom Mk.IV Male "TV build"

Collapse
This topic is closed.
X
X
 
  • Time
  • Show
Clear All
new posts
  • Guest

    #76
    Cheers guys!
    I've been diving into all reference photos available and the WWI helmets are taller and bulkier than the later WWII ones, and perhaps a bit wider rim too?
    The helmets on my figures are still too big but not as humongous as I initially thought...


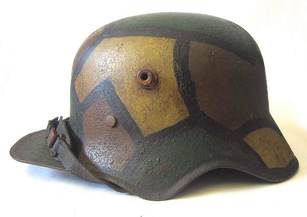
    At least it's close enough to continue and not try to find replacement helmets...

    One thing is interesting about these early WWI helmets because whoever designed them knew what they were doing because this is still roughly the design most modern armies are using today, albeit in various composite materials and thick padding.

    We've had a real cold front hitting even us in the south with -10°C and really cold winds so I feel a bit too stiff for doing the last painting bits so it'll have to wait until it gets a bit warmer - or at least my body has adapted...
    I hate the white crap and I was hoping moving south would save me from it but fat chance of that. Luckily it's soon March and before April hits us spring will have begun!
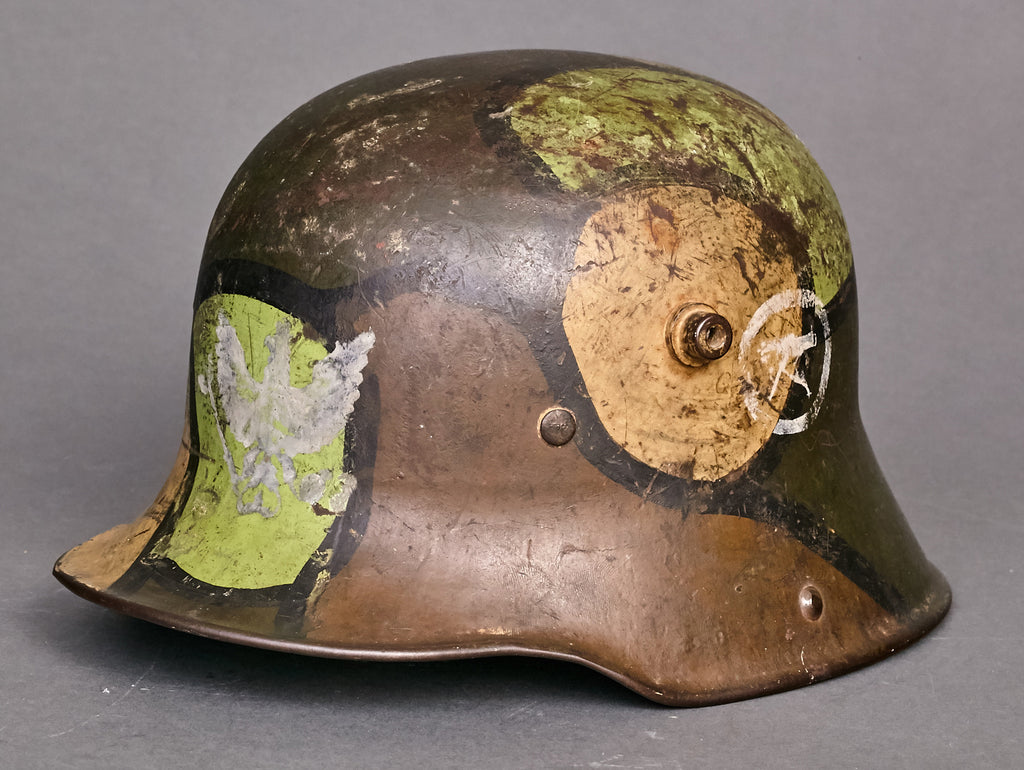
    Comment

    • Guest

      #77
      Looking great so far.

      Comment

      • Guest

        #78
        This is my first real update in months on this project and it feels really good!!!

        I've started to weather the figures but I can't really do much more until they're pinned and glued down to the vignette so a respectable glass of a descent port to build up the courage and then I was ready to commit to the project!

        There's still a ton to do with regards to weathering, let alone doing the mud tracks that the tank made driving up the slope.
        I've been debating whether I should glue down the tank to the vignette or carefully try to make the mud tracks so it can be removed, but I just can't see how I can do it tight enough since the mud would be pushed out, up and also a bit onto the tracks so I shall ponder on a bit more until tomorrow and then see if I'm ready to commit to that exercise...?


        I'm also pleased with the barbed wire I painstakingly made a couple months ago. It's as close to scale correct as humanly possible but it's a one core, not a two core twisted barbed wire because that proved both overly complex and made it look too thick. I will make the barbed wire rusty, like their posts, but that's one of the last steps because I don't want it to rub off.

        Although it's a muddy scene I will finish the dirt/mud with a few different pigments towards the end to make it appear less wet.
        It's a side effect of my PVA mixed with ordinary dirt raided from a flower pot. I hope some pigments will make it appear less wet...

        This is my first ever vignette so I've made just about every mistake I could but I'm getting better and better at recovering from my mistakes so I've learned loads on this project and my next vignette/diorama will go much faster! (especially since I won't start another until I've got all the bits and bobs at home and not make the same mistake as this one )

        I'm happy with my grenade lobbing Fritz but his running pal Klaus has a face only a mother can love... Sometimes painting with oil paints just works and then you try the same again and it all goes ti*s up?!

        Anyhow, some progress and I'm finally beginning to see the end of this project.
        Did it turn out like I visualised it? No. Almost but not exactly. My dirt/mud isn't scale accurate and I will sieve the dirt next time and apply a thin layer of dry earth on top of the still wet PVA mud to make it look less shiny.
        I've still not decided how to frame the vignette base? I've got an idea for something that might look great IF I can pull it off, but on the other hand a simple frame doesn't take focus from the vignette...

        I hope it'll look descent enough to not have to hide it in a couple of months but it's been a fun project and I've learned loads for the next one!
        I'm pleased with the tank though and 50% of the figures

        Comment

        • grumpa
          • Jan 2015
          • 6142

          #79
          Originally posted by Jens Andrée
          This is my first real update in months on this project and it feels really good!!!

          I've started to weather the figures but I can't really do much more until they're pinned and glued down to the vignette so a respectable glass of a descent port to build up the courage and then I was ready to commit to the project!

          There's still a ton to do with regards to weathering, let alone doing the mud tracks that the tank made driving up the slope.
          I've been debating whether I should glue down the tank to the vignette or carefully try to make the mud tracks so it can be removed, but I just can't see how I can do it tight enough since the mud would be pushed out, up and also a bit onto the tracks so I shall ponder on a bit more until tomorrow and then see if I'm ready to commit to that exercise...?


          I'm also pleased with the barbed wire I painstakingly made a couple months ago. It's as close to scale correct as humanly possible but it's a one core, not a two core twisted barbed wire because that proved both overly complex and made it look too thick. I will make the barbed wire rusty, like their posts, but that's one of the last steps because I don't want it to rub off.

          Although it's a muddy scene I will finish the dirt/mud with a few different pigments towards the end to make it appear less wet.
          It's a side effect of my PVA mixed with ordinary dirt raided from a flower pot. I hope some pigments will make it appear less wet...

          This is my first ever vignette so I've made just about every mistake I could but I'm getting better and better at recovering from my mistakes so I've learned loads on this project and my next vignette/diorama will go much faster! (especially since I won't start another until I've got all the bits and bobs at home and not make the same mistake as this one )

          I'm happy with my grenade lobbing Fritz but his running pal Klaus has a face only a mother can love... Sometimes painting with oil paints just works and then you try the same again and it all goes ti*s up?!

          Anyhow, some progress and I'm finally beginning to see the end of this project.
          Did it turn out like I visualised it? No. Almost but not exactly. My dirt/mud isn't scale accurate and I will sieve the dirt next time and apply a thin layer of dry earth on top of the still wet PVA mud to make it look less shiny.
          I've still not decided how to frame the vignette base? I've got an idea for something that might look great IF I can pull it off, but on the other hand a simple frame doesn't take focus from the vignette...

          I hope it'll look descent enough to not have to hide it in a couple of months but it's been a fun project and I've learned loads for the next one!
          I'm pleased with the tank though and 50% of the figures
          Great work Jens, with your dedication you'll be running rings around us all soon enough.

          Carry on mate.

          Jim

          Comment

          • Guest

            #80
            Superb weathering and dio.

            Comment

            • papa 695
              Moderator
              • May 2011
              • 22771

              #81
              It's looking fantastic Jens, plenty of hard work and lessons gone into it.

              Comment

              • Guest

                #82
                Originally posted by papa 695
                It's looking fantastic Jens, plenty of hard work and lessons gone into it.
                Mostly lessons learned

                The most important thing I've learned, or at least one of them, is to plan in advance so you know which products take the longest to dry/set/cure and use as little as possible of them.
                I've had to wait several days for some steps to dry and that's killing the creative process.
                The first batch of mud I made from dried soil from a flower pot I mixed with both PVA and water to make it easier to sculpt. It took forever to dry...
                Next batch I mixed with mostly just PVA and a splash of isopropanol and that dried in 4 hours! Big difference.

                Doing the design and layout on paper first was a good thing because I could work without having to stop and think but after starting the vignette I bought a book about making vignettes and there were so many things I didn't know like angles and stuff. I'd already designed the layout to have the tank a bit askew so that was lucky but I think my next one will be better with regards to angles and levels/height.

                This takes modelling to a whole new level and I have big respect for you vignette/diorama builders because I now know how much work is involved to make them look not just good, but to scale - which isn't as easy as it looks.
                I'm going to buy a couple of sieves with different mesh sizes so I can screen my materials according to size to better control scale in the future. This one was just winged and improvised and I'm glad it turned into something that doesn't just look like a big turd! :tongue-out:

                Many thanks for all your kind comments!

                Comment

                • Guest

                  #83
                  More grass in the making.
                  They'll get painted as soon as the glue has dried.
                  The more you make the better since they're nice to have ready made in a box.

                  [ATTACH]294313[/ATTACH]

                  Only snag is that the static grass gets everywhere!!!

                  Comment

                  • stillp
                    SMF Supporters
                    • Nov 2016
                    • 8097
                    • Pete
                    • Rugby

                    #84
                    Very nice, but shouldn't the guy with the rifle be running the other way?

                    Pete

                    Comment

                    • Guest

                      #85
                      Originally posted by stillp
                      Very nice, but shouldn't the guy with the rifle be running the other way?

                      Pete
                      Not if he wants to have a grenade in his head

                      There's a story there but it's not being told just yet. Still plenty work to be done on this vignette.

                      Comment

                      • colin m
                        Moderator
                        • Dec 2008
                        • 8763
                        • Colin
                        • Stafford, UK

                        #86
                        It's been a while since I checked in here, and well now, what a development. This is looking really nice.

                        Comment

                        • Guest

                          #87
                          I need some advice here because I'm stuck not knowing what's right or looking right?

                          [ATTACH]294666[/ATTACH]

                          This is about where I am at the moment, apart from a couple more grass tufts in a few places.
                          I'm not happy the way it looks and I see two ways to progress.

                          1. Paint the mud and dirt with a few different browns (lighter) and use pigments to make it more varied and drier, apart from the tracks.

                          2. Apply static grass directly onto the vignette, apart from the tracks and where it wouldn't grow.

                          What would you do? (or what do you suggest I should do?)

                          It looks too sterile and mono-toned as it is right now and I don't feel the creativity flow at all the way it is... Normally this just happens by itself but I think I lost all momentum waiting for the figures...

                          Many thanks in advance!
                          Jens

                          p.s. I've not yet weathered the figures but I want to fix the vignette first.

                          p.p.s Here's my original inspiration

                          [ATTACH]294667[/ATTACH]

                          Comment

                          • papa 695
                            Moderator
                            • May 2011
                            • 22771

                            #88
                            I think it's looking great Jens, if your going to put grass on I wouldn't put too much and make it very dirty also, but other than that I don't think there's much else to do. You could tinker with the colours of the mud, but then I'm thinking your just wanting to make something that looks great, look great.

                            Comment

                            • Guest

                              #89
                              Originally posted by papa 695
                              I think it's looking great Jens, if your going to put grass on I wouldn't put too much and make it very dirty also, but other than that I don't think there's much else to do. You could tinker with the colours of the mud, but then I'm thinking your just wanting to make something that looks great, look great.
                              Cheers Ian but it's just not looking right the way it is at the moment and it's not "speaking" to me what to do?

                              The grass tufts I've made and added are painted brown in random strength and intensity to make it look half dead and dirty but the rest of the base is just to sterile and anonymous.
                              Not looking realistic - or at least not what I had in mind. Perhaps the many months waiting for the figures killed the inspiration or I forgot what I had started?

                              I think I will try to spray some different browns to create some dry patches on top of upturned mud and earth and keep it dark and wet looking where it's low and in shade, or it's been disturbed somehow...?

                              Perhaps I should just go for it with the big selection of weathering stuff and just see what happens? That sometimes works wonders

                              Comment

                              • Guest

                                #90
                                A little bit of random chocolate brown made a huge difference so I think this is a step in the right direction.
                                It'll have to be a brush exercise though since I'm not a huge fan of using Vallejo model color in the airbrush... Just tried and 30 seconds of spray - 5 minutes of cleaning...

                                Comment

                                Working...