Scale Model Shop

Collapse

SimonT - 1/35 Tamiya Sdkfz.223

Collapse
X
 
  • Time
  • Show
Clear All
new posts
  • SimonT
    • Apr 2018
    • 2824

    #1

    SimonT - 1/35 Tamiya Sdkfz.223

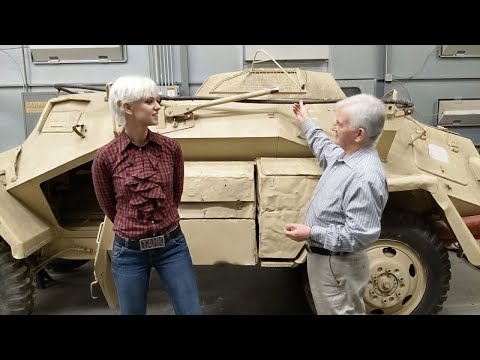
    This Tamiya golden oldie along with its brother the 222 have long been a favourite and I have made quite a few over the years

    Rather inaccurate, as are most of the earlier Tamiya kits and missing a lot of detail but I still like it and have a few 222/223's in the stash

    (I do have a few of the much newer and better detailed Hobbyboss examples in the stash which I intend to get to eventually)

    This one was bought from John as a damaged box item at a slightly reduced price - the kit itself only suffered from very minor damage on the lower hull and nothing that can't be fixed

    I have slowly been working away on this in the background to clean up all the parts

    it has now progressed to assembly so I decided to bring it to the forum

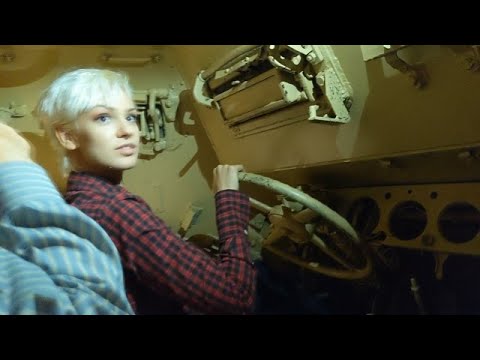
    The insides have had a few tweaks but only enough to fill the void and make it look like there is a full interior - got a bit carried away with the radiator but reigned it in with the rest of the details. Once there is a crew figure inside it will mostly be obscured so it just has to convey the impression of interior

    I have corrected the basic internal layout from what Tamiya provide so the radio is now on the left side, the large round post from the 222 has been cut out and replaced with a scratched cone shape, basic map box added in front of the cone and a basic seat/table/storage box added on the right side - all based on the remains of a 223 in the Nuts and Bolts book

    I also added a basic representation of the bolted flanges that hold the front and rear body halves together, mg ammo racks, first aid box etc

    The largest mod was cutting out the hull top so that the Eduard etch mesh can be installed

    A couple of windows have been cut in the upper hull and all the body seams have been 'welded' with the pyrogravure after scraping in the basic panel edges - still need a quick rub with scotch pad to remove the wispy bits

    All other mods so far are just the normal scraping and sanding of all edges and flat surfaces to remove mould flare and square things up and thin things down as required

    Enough waffle, here are the pictures, in totally random order chosen by the computer

    Click image for larger version

Name:	223-001_2020-7-14.jpg
Views:	0
Size:	2.7 KB
ID:	1129051Click image for larger version

Name:	223-002_2020-7-14.jpg
Views:	0
Size:	2.9 KB
ID:	1129052Click image for larger version

Name:	223-003_2020-7-14.jpg
Views:	0
Size:	2.8 KB
ID:	1129053Click image for larger version

Name:	223-004_2020-7-14.jpg
Views:	0
Size:	2.8 KB
ID:	1129054Click image for larger version

Name:	223-005_2020-7-14.jpg
Views:	0
Size:	1.7 KB
ID:	1129055Click image for larger version

Name:	223-006_2020-7-14.jpg
Views:	1
Size:	2.9 KB
ID:	1129056Click image for larger version

Name:	223-007_2020-7-14.jpg
Views:	0
Size:	3.0 KB
ID:	1129057Click image for larger version

Name:	223-009_2020-7-14.jpg
Views:	0
Size:	3.0 KB
ID:	1129058Click image for larger version

Name:	223-010_2020-7-14.jpg
Views:	1
Size:	3.2 KB
ID:	1129059Click image for larger version

Name:	223-011_2020-7-14.jpg
Views:	1
Size:	2.8 KB
ID:	1129060Click image for larger version

Name:	223-008_2020-7-14.jpg
Views:	0
Size:	3.3 KB
ID:	1129061
  • papa 695
    Moderator
    • May 2011
    • 22770

    #2
    Some very nice work Simon.

    Comment

    • SimonT
      • Apr 2018
      • 2824

      #3
      Cheers Ian - could have spent more time on detailing it but hopefully this will be enough to make it look busy inside

      Comment

      • rtfoe
        SMF Supporters
        • Apr 2018
        • 9084

        #4
        I like old stuff being refurbished and brought up to higher standards Simon. This is looking good with just enough and not overboard.

        Cheers,
        Richard

        Comment

        • SimonT
          • Apr 2018
          • 2824

          #5
          Thanks Richard - I usually go way too far with detailing stuff that can not be seen so this is quite restrained compared to usual :smiling5:

          Comment

          • Neil Merryweather
            SMF Supporters
            • Dec 2018
            • 5185
            • London

            #6
            Sweeeet

            Comment

            • Guest

              #7
              Have you seen this?

              Comment

              • SimonT
                • Apr 2018
                • 2824

                #8
                That’s cracking Jakko :thumb2:

                It’s the vehicle that is in the Nuts and Bolts book but looking a bit smarter - been cleaned out and repainted at some point by the look of it

                Good view of the engine compartment as well

                Comment

                • Jim R
                  SMF Supporters
                  • Apr 2018
                  • 15692
                  • Jim
                  • Shropshire

                  #9
                  Hi Simon
                  I enjoy watching you "upgrade" an old kit. As Richard says you're doing just enough although you may revert to type and end up scratching stuff that won't be seen. That film of Jakko's is good. Claustrophobic isn't in it. I saw an episode of Combat Dealers with Hilary Doyle in it - certainly knows his stuff.
                  Jim

                  Comment

                  • Guest

                    #10
                    Originally posted by SimonT
                    It’s the vehicle that is in the Nuts and Bolts book but looking a bit smarter - been cleaned out and repainted at some point by the look of it
                    I didn’t watch it again this morning, but they mention this one is under restoration, don’t they? Which is probably a very good moment to make a video like this, as all the stuff isn’t in the way

                    Originally posted by Jim R
                    I saw an episode of Combat Dealers with Hilary Doyle in it - certainly knows his stuff.
                    Certainly he’d be more bearable than the rest of the people in that show, I would think. But if you want more short explanations of his on German armour, there’s other videos with him on Sofilein’s YouTube channel.

                    Comment

                    • scottie3158
                      SMF Supporters
                      • Apr 2018
                      • 14201
                      • Paul
                      • Holbeach

                      #11
                      Simon,
                      very restrained but nicely done.

                      Comment

                      • JR
                        • May 2015
                        • 18273

                        #12
                        I'm in.

                        Comment

                        • SimonT
                          • Apr 2018
                          • 2824

                          #13
                          Jim - started getting carried away with the radiator but managed to step back away from the brink before things went too far :smiling5:
                          Very tight space and even more so when fully loaded with kit - radios in the racks, ammo in all the side racks, mess tins, gas mask cases, water bottles all mounted in side racks, an MP40 on the right side and the cone shaped pedestal with seat in the centre below the small turret. Very cosy indeed. I've seen that CD episode as well where he identified that half track from the chassis number

                          Jakko - yes they do. The book was printed 1996 and the 223 was in a very sorry state, missing lots of bits and in a general state of disrepair, probably just as plucked off the battlefield. In the video Mr Doyle says he found them the turret for it and it now has the roof aerial and fittings that are all missing in the book

                          Scottie - thanks as ever

                          John - sorry, won't be green :smiling5:


                          Morning all,

                          added a few bits of etch last night

                          Click image for larger version

Name:	223-012_2020-7-15.jpg
Views:	1
Size:	2.8 KB
ID:	1129119
                          Click image for larger version

Name:	223-014_2020-7-15.jpg
Views:	1
Size:	2.8 KB
ID:	1129121
                          both missing inner wing sections that form the side plates of the stowage bins

                          Click image for larger version

Name:	223-013_2020-7-15.jpg
Views:	0
Size:	2.5 KB
ID:	1129120
                          the front mounted jerrycan rack - have some nice Miniart cans for that. Should look a bit better than the crappy old Tamiya attempts at cans

                          Click image for larger version

Name:	223-015_2020-7-15.jpg
Views:	0
Size:	2.6 KB
ID:	1129122
                          the front deflector for the hull roof - there are a couple of shorter side ones still to add

                          the Eduard set, as usual, doesn't give any positioning info but luckily there is a good 35th plan in the Nuts and Bolt book

                          Comment

                          • SimonT
                            • Apr 2018
                            • 2824

                            #14


                            From the link Jakko posted above this is a bit of a walk around - the aerial can be seen better in this one. It is not actually mounted, just sat in place

                            Comment

                            • SimonT
                              • Apr 2018
                              • 2824

                              #15
                              Click image for larger version

Name:	223-017_2020-7-18.jpg
Views:	0
Size:	3.7 KB
ID:	1129319
                              exhausts assembled and the gaping holes filled - still need to drill the ends out and fit the outer skins to the silencer boxes

                              Click image for larger version

Name:	223-020_2020-7-18.jpg
Views:	0
Size:	2.4 KB
ID:	1129322
                              made a cover for the spare wheel from Duro

                              I then assembled the aerial
                              Click image for larger version

Name:	223-022_2020-7-18.jpg
Views:	0
Size:	4.0 KB
ID:	1129324
                              these are the kit mounting points on the aerial - rectangular blocks

                              Click image for larger version

Name:	223-016_2020-7-18.jpg
Views:	0
Size:	4.2 KB
ID:	1129325
                              so I filed them down

                              once glued to the mounting poles I finished filing them down to match the diameter of the poles

                              Click image for larger version

Name:	223-019_2020-7-18.jpg
Views:	0
Size:	2.2 KB
ID:	1129321
                              the poles had the solid ends scraped out and pivot pin ends added

                              Click image for larger version

Name:	223-021_2020-7-18.jpg
Views:	0
Size:	31.8 KB
ID:	1129323
                              the top ends should pivot as well so that it can be lowered so pin ends added

                              Click image for larger version

Name:	223-018_2020-7-18.jpg
Views:	0
Size:	3.1 KB
ID:	1129320
                              and how it looks overall with the aerial installed

                              Comment

                              Working...