Scale Model Shop

Collapse

Who? Who? Ron's 251/20 UHU , that's who !

Collapse
X
 
  • Time
  • Show
Clear All
new posts
  • Guest

    #46
    Originally posted by RonGlass
    this opens up a whole new level of modeling ! I'm eager to pursue this technique, not as difficult as I'd always assumed.
    Cool What you made looks great, like I said it’s a simple shape so ideal for a first attempt, and you seem to have nailed it. If you want more strength you can also use brass, for example to replace an over-thick kit part.

    Comment

    • RonGlass
      SMF Supporters
      • Apr 2018
      • 801

      #47
      Originally posted by Jim R
      Hi Ron
      Damage looks good. I have seen Jakko's idea of replacing mudguards and the like with pewter sheet used very successfully. The late Simon T used pewter sheet a lot.
      Jim
      Thank You Jim !

      Comment

      • RonGlass
        SMF Supporters
        • Apr 2018
        • 801

        #48
        Originally posted by rtfoe
        Hibernation did you say Ron? I've resurrected some of my projects too. Mean interior add ons there and nice fender benders. One trick I do is using a large bur on the drill I bounce off edges and gorge deep wedges on fender surfaces then sanding and applying wet cement to create soft damage to thin metal. This way I don't have to scratch the whole fender.

        Cheers,
        Richard
        Thanks Richard that is an interesting technique that I will definitely try, perhaps with the side storage lockers on this build !

        Comment

        • RonGlass
          SMF Supporters
          • Apr 2018
          • 801

          #49
          Originally posted by scottie3158
          Ron,
          It is a very useful item to have in the spares box I have used it to great effect in previous builds and as you rightly said it isn't as hard as you would think. Which you have shown to great effect.
          Thanks Paul ! I'm posting today's work, hopefully it will have your favor !

          Comment

          • RonGlass
            SMF Supporters
            • Apr 2018
            • 801

            #50
            Originally posted by Jakko
            Cool :smiling3: What you made looks great, like I said it’s a simple shape so ideal for a first attempt, and you seem to have nailed it. If you want more strength you can also use brass, for example to replace an over-thick kit part.
            Thanks Jakko yep I see where a lot of finesse and developed technique are needed with this type of work, hopefully I will get there. I do have the desire to pursue this new skillset !

            Comment

            • RonGlass
              SMF Supporters
              • Apr 2018
              • 801

              #51
              Well here us what I ended up with today. After I finished, I learned that the passenger-side fender bracket holder for the axe should be in a diagonal position but I'm not going to sweat that mistake. And the Notek light generally confused me , regarding the routing of the supply cable. I (think) that my guesstimate is okay enough. Like Scottie said a while back, every day is a school day in our hobby
              I'm happy with today's result but do strive for better,. this is a stepping stone , hopefully.
              Attached Files

              Comment

              • Guest

                #52
                Originally posted by RonGlass
                the Notek light
                You mean the headlight? The Notek light is the one with the coal scuttle on top:
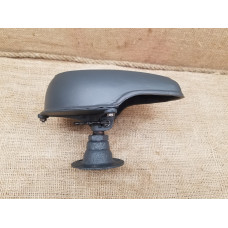


                Originally posted by RonGlass
                generally confused me , regarding the routing of the supply cable. I (think) that my guesstimate is okay enough.
                I don’t have an extensive library on this vehicle, but from a bit of browsing it seems the cable ran much as you have it, except that instead of bending towards the back under the mudguard, it went vertically down along the armour plate and then under, towards the centreline of the vehicle.

                Comment

                • RonGlass
                  SMF Supporters
                  • Apr 2018
                  • 801

                  #53
                  Originally posted by Jakko
                  You mean the headlight? The Notek light is the one with the coal scuttle on top:

                  Uhuun


                  I don’t have an extensive library on this vehicle, but from a bit of browsing it seems the cable ran much as you have it, except that instead of bending towards the back under the mudguard, it went vertically down along the armour plate and then under, towards the centreline of the vehicle.

                  Comment

                  • RonGlass
                    SMF Supporters
                    • Apr 2018
                    • 801

                    #54
                    That's it Jakko, what I wasn't clear with was the routing from the fender location. Later I came across a pic of a UHU in a holding area with a clear view which is what I"d already gone with. So good there.
                    Also was the orientation of the Notek's mounting baseplate. Sources varied until I realized that earlier 251s had a simpler plate , like that of the width indicators. In that case the wire just led straight through the fender.
                    In another case the baseplate was orientated differently where the wire exits the back but circles back immediately toward the front edge of the fender.
                    Then the later ones like mine exit the inner side. So there is a lot of variation among reference pics. Not to mention surviving vehicles with dubious restorations.

                    Comment

                    • Guest

                      #55
                      Restored vehicles are always suspect, if you ask me. You never know what shortcuts, substitutions or misunderstandings the restorer took/made/had, so much better to look at photos of the vehicle in real use, or at the factory.

                      Comment

                      • Tim Marlow
                        SMF Supporters
                        • Apr 2018
                        • 18891
                        • Tim
                        • Somerset UK

                        #56
                        Originally posted by Jakko
                        Restored vehicles are always suspect, if you ask me. You never know what shortcuts, substitutions or misunderstandings the restorer took/made/had, so much better to look at photos of the vehicle in real use, or at the factory.
                        Also holds true for front line repair units I should think Jakko?

                        Comment

                        • Guest

                          #57
                          You mean that they might repair a damaged vehicle with parts that don‘t belong on it? Something like this:

                          [ATTACH]449143[/ATTACH]

                          (Ignore the wood gas installation, look closely at the hull instead )

                          Comment

                          • RonGlass
                            SMF Supporters
                            • Apr 2018
                            • 801

                            #58
                            First of the side storage lockers... I have too much skill to acquire yet with the Black Art of metal work and I like Richards suggested method, so went with that. Lots of practice needed with that way as well but this is what I ended up with. I had an old Eduard photoetch set for the aging Tamiya kit , and rummaging the parts box produced a pair of aging Tamiya side lockers. So for better or for worse, here ya go....
                            PS will attempt to add detail to the inner side of those door handle boxes too
                            Attached Files

                            Comment

                            • Caustik Filth
                              SMF Supporters
                              • Jan 2022
                              • 364
                              • Rob
                              • Portsmouth

                              #59
                              Cushtie Ron...

                              Comment

                              • Jim R
                                SMF Supporters
                                • Apr 2018
                                • 15668
                                • Jim
                                • Shropshire

                                #60
                                Looking great Ron. Your attention to detail is really paying off.
                                Jim

                                Comment

                                Working...