Actually she just raised an eyebrow and left it at that...I have though done it before so she is used to it....but the latest set of arrivals (that she knows about) have led to serious discussions about the size of my stash......:fearful:....but more about that later. I am waiting for a couple more things to arrive........
Andrew's 2x 1/72 S-Model Jagdpanthers
Collapse
X
-
Comment
-
Good evening all and especially Rick aka Mini Me
So I was faced with a dilemma this evening.....
.....Junior was playing online with his school buddies.....and my wife was out for the evening.....what is a man to do?....it's like the modelling Gods were saying I HAD to spend time at the bench!!!!

I briefly toyed with doing the Yak-3 as it has reached the PE stage but I wanted to save that until club night on Tuesday.
So I decided to return to the Jagdpanthers. These had been put on hold whilst I got the Raiden over the line...plus I putting off doing the camo.
As you we all know German AFV camo is a dark and mysterious art, with so many documented exceptions to the numerous rules that I'm sometimes left wondering if there were more exceptions than ones that actually followed the rules!
However, as I explained previously, I have gone for a two tone Dunkelgelb/Olivegrun scheme. But why?
Well......the Tanks Encyclopedia website has four drawings of vehicles from schwere Panzerjäger Abteilung 654 in Normandy (my chosen unit and timeframe)....with four different camo schemes. Only one though has the two piece barrel and this has a two tone yellow/green scheme.
tanks-encyclopedia.com/ww2/nazi_germany/jagdpanther.php
And.....the World War Photos website has several shots of JPs purporting to be from sPzAbt 654. One has what is almost certainly a two scheme of unknown colours. Whilst several other JPs are in shot, it is impossible to tell what camo scheme they have due to the angle/focus of the shot but what is noticeable is that the one that is fully side on has the road wheels in alternating colours, when none of the others appear to.
www.worldwarphotos.info/gallery/germany/tanks-2-3/jagdpanther/jagdpanthers-654abt/
So in short, my two are a homage to the one I found on the World War Photos website. The Olivgrun is Vallejo's Model Air 71.092 Medium Olive RAL 6003.
I was very worried about trying to do the blotches at this scale but I think I have pulled it off. One of them has slightly darker green blotches than the other. That was unintentional but gives a bit of variation.
ACW as usual
Andrew
----------------------------------------------------------
My inspiration.....

www.worldwarphotos.info/gallery/germany/tanks-2-3/jagdpanther/jagdpanthers-654abt/
My two homages....

Comment
-
Thanks Rick looking ok aren't they.
I used my best/most expensive/finest AB. Officially it's a Tamiya Superfine AB (0.2mm) needle but actually half of it, including needle and nozzle, are IWATA. I also had a proper play with one of those inline MAC valves to help with the airflow....plus of course the paint consistency, as I was really worried about flooding the surface.
It took a while to get everything balance right but I got there in the end...there were only a couple of spots where it went wrong but I was able to hide it ok.
Just got paint the tracks, tools and a few paint scratches. I'm going to keep the weathering fairly light, as they had not been with the unit for more than a few months at most and in most cases much less than that and also didn't see any action until the end of July.
Thanks as always for the support.
AndrewComment
-
Good evening all
So I have managed to finish the tracks using the following process:- Touch up the wheels in yellow or green to cover the worst of the overspray.
- Paint the the relevant parts of the road wheels steel where the paint is worn off. You can see this best on the front road wheels but you can just pick out where I did it in between the track teeth too.
- Paint the tracks. I experimented for the first time with the official ' Dave Ward specially patented track paint method' that he's previously demonstrated. Basically mix black, dark grey, mid-dark brown and steel paints to your taste. This leaves you with a nice darkish grey that has a slight sheen, which is used a starting base. I started with roughly equal proportions of each (I think) but need to play around a bit with it and would like slightly more sheen than I have this first time. It certainly shows promise and it's occurred to me you can achieve a very wide variation of colours simply by varying the ratios slightly
- Paint the rubber on the outer road wheels.
- Finally, touch up where I got careless or slipped!!!

They look ok from side on, if obviously very new but, at an angle, they clearly betray the limits of the one piece moulding technique used, as the outer wheels are far too thick......
BUT you have to remember that these are meant for wargaming....so I am not expecting these to be state of the art and perfect in every respect. Plus I got two in a box for less than £16 brand new from China - £8 each, so I can't complain. And they are clearly Jagdpanthers and no mistake!
Even though these are one-piece units, it wasn't that hard in the end and in an odd way was strangely theraputic......no faffing with an AB, booth, masks and the all the associate gubbins....just a couple of brushes and some paint in my steel paint palette - simples!
ACW as usual.
Andrew
------------------------------------------------------------------------------


Comment
-
See what you mean about the "thick" road wheels....overall I think you have pulled it off and with a little weathering they should look the bomb. If you are looking for a little more of the metallic effect, I would suggest a steel or silver prisma color pencil to just hit the high spots on the track edges and grousers....this can then be toned down with a wash of your choice.
Comment
-
 Guest
Guest
Eh … sorry, but you just painted the rubber tyres as steel … The rim below the tyres is where paint would rub off and cause bright metal to be visible. Look closely at this photo:
[ATTACH]494580[/ATTACH]
The tyres are dull, then there’s a bright ring, and then the painted rest of the wheel.Comment
-
RickSee what you mean about the "thick" road wheels....overall I think you have pulled it off and with a little weathering they should look the bomb. If you are looking for a little more of the metallic effect, I would suggest a steel or silver prisma color pencil to just hit the high spots on the track edges and grousers....this can then be toned down with a wash of your choice.
Thank you for the support and the tip on metallic finish duly noted but I'll leave it this time....mainly because I don't have any!
Hi Jim
Thanks for the support, they won't win any modelling prizes but on a wargaming table, there is no mistaking what you are!!!
Its funny but this is the first time I have really got to grips with the MAC valve and got it to work properly!
Eh … sorry, but you just painted the rubber tyres as steel … The rim below the tyres is where paint would rub off and cause bright metal to be visible. Look closely at this photo:
[ATTACH=CONFIG]n[/ATTACH]
The tyres are dull, then there’s a bright ring, and then the painted rest of the wheel.
Hi Jakko
I see what you mean from your shot.....as you say looking at my Panther wheels have also have the distinctive rim.
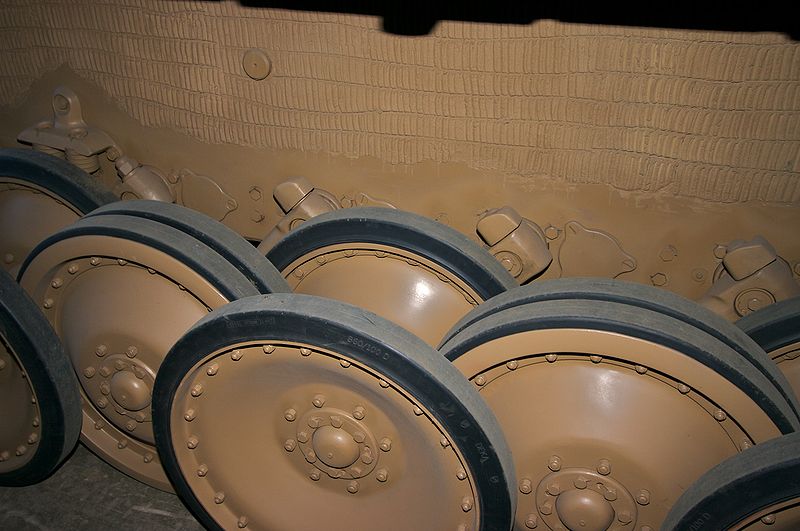
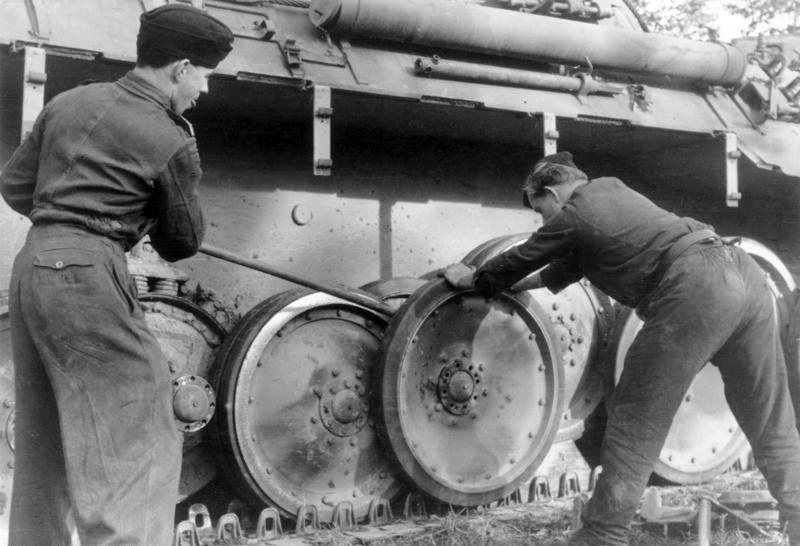
I was going on the below reference shot of one from the unit mine will nominally be from and the whole side is shiny. Also, elsewhere, someone provided some close up shots of some in the museum and there is no protruding 'rim' on the side....it very obviously flat and the rubber is largely hidden behind the metal.
Armourfast kits don't a rim but I am taking that with a BIG pinch of salt given their price bracket.
Also the front road inner wheel on your demo shot looks like the ones below but I may be wrong....I can't tell on the second inner wheel on your shot
Is it possible there were two slightly different designs of inner wheel?
Thanks again all!!
ATB
Andrew
Shots for vehicles from the actual unit (allegedly)...as you can see the sides are very bright!

The reference shots I was provided with....definitely no 'lip' on the the rim, unlike mine.


I have also found this one, with 'flatter' sides...
Comment
-
 Guest
Guest
What’s going on is that there is only one type of wheel, but the outer row has the other side outward than the second row. There is a wider rim on the “back”, which of course becomes the front on the second row, and the paint on that eventually wears off completely. I suspect it’s not actually truly flat, because on the photo I posted, it looks like paint has only worn off at the base of that rim and not along its outer edge.
I had forgotten about that wider rim, but the rubber tyre still sticks out beyond it a bit and would be visible as a darker line. Which, altogether, would be very tricky to paint on a 1:72 scale model even if the wheels had been moulded separately
Comment
-
So Jakko, if I have this right, that 'double' wheel in the middle is not a single wheel as I thought......but is two of exactly the same wheel with the concave sides facing each other, forming a sort of void of sorts? I really do not know much!What’s going on is that there is only one type of wheel, but the outer row has the other side outward than the second row. There is a wider rim on the “back”, which of course becomes the front on the second row, and the paint on that eventually wears off completely. I suspect it’s not actually truly flat, because on the photo I posted, it looks like paint has only worn off at the base of that rim and not along its outer edge.
I had briefly thought about doing it when I saw the museum close up shots but then decided that given that they're not 'display' pieces, decided it wasn't worth the hassle. Especially as one of them is going to have schürzen on and so most of it won't be visible.
Thanks as always for your input and adding to my understanding!
ATB
AndrewComment
-
 Guest
Guest
That’s exactly what it is, yes. Panthers had four rows of roadwheels, even though it doesn’t look like it at first sight. Not the greatest pic, but it shows how this all fit together:

Note that the third axle has the all-steel wheels that a limited number of Panthers got, while the first two have the more usual type like on your Jagdpanthers.
However, I now see I was wrong: the wheels in the middle pair are slightly different from the outer ones, in that they have a wider rim on the side coming into contact with the track teeth, which is lacking on the outer wheels. I’m guessing this is to prevent wear to the rubber. I thought that wider rim was simply on the back of all the wheels.
Probably not, no
Comment

Comment