
-
-
This is looking great Steve,should make a nice scene with the figure's you have.Comment
-
nice progress so far with this one Steve,liking the look of it,
Comment
-
Built the 4 doors last night, whilst the moulding is very sharp and crisp, the sprue tabs are in some stupid places, on both front doors, the actual tab is proud of the door surface, so you need to cut the tab off and then using various degrees of sanding sticks, sand of the ‘proud’ tab and polish. Not an arduous task, but one I wouldn’t have expected with this kit from Meng. Similar story with the back doors, but to make it worse actually attached to the sprue on the rebated edge where the door closes. The Gun seems to be overcomplicated to build, not so much the gun but the cradle, trying to get 5+ points matched up on either side of the gun wasn’t easy and to get the stem to join took more sanding of ejector pin marks. Would have been a lot easier to mould the cradle as one and slip the gun in-between, but its built now so that’s okay, just need to build the machine gun and will be ready for spraying.
Photos later today.Comment
-
Looking good SteveComment
-
Looking good SteveComment
-
With my wife working, son watching the England game, daughter at my mother in laws I actually got some time to get some spraying done, so got the booth and compressor set up in the utility and off I went, got the primer down on the bits for the Tiger, flesh on the figures for the tiger and a couple of busts, don’t know what it is with Vallejo balck primer, but the last twice it just wont spray, don’t think it likes the .3 needle, so will have to try .5 next time. I know it wasn’t me (this time) as the other ‘air’ colours sprayed superbly, so got the seats faded, inside doors and inside upper hull painted in pale blue/grey. Once dry then coated with satin varnish ready for the camo decals, also on the driver and passenger seat along with dashboard and gearbox/drive cover. Silver sprayed where required, then masked and coated with black One advantage of spraying in the utility is the sink – running cold water so very easy to flush out the brush between paint swaps, couple of minutes and nice and clean. Plus when I gotthe air hose tangled on my foot and spilt a cup of black primer on the floor, quick wipe and sorted , if it had been carpet, would just have packed a suitcase and left !!
Apologies for photos - taken quickly and on my phone !!
Comment
-
Now that is what you call time management!!
Looking good!Comment
-
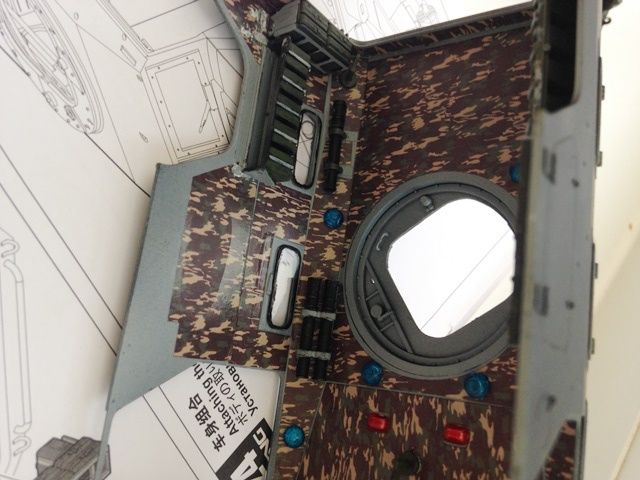
After a couple of relaxing hours, you get this far with the camo decals (well i did), still havent worked out why the russians decided to camo the inside of the vehicle though. The decals went on a treat, after a satin varnish coat was left to dry for 24 hrs, used Vallejo Decal medium and Decal Fix;


Next roof lining and top sides to add and then camo done.
Needs a little touch up on the silver floor.Comment
-
Interesting to see a camo'd interior Steve. For some reason it's reminding me of Del Boy's bedroom :P
I guess it's to prevent any spotters seeing the vehicle through its windows or open hatches?
Looking good thoughComment
-
Got the final part of the camo decals on last night;

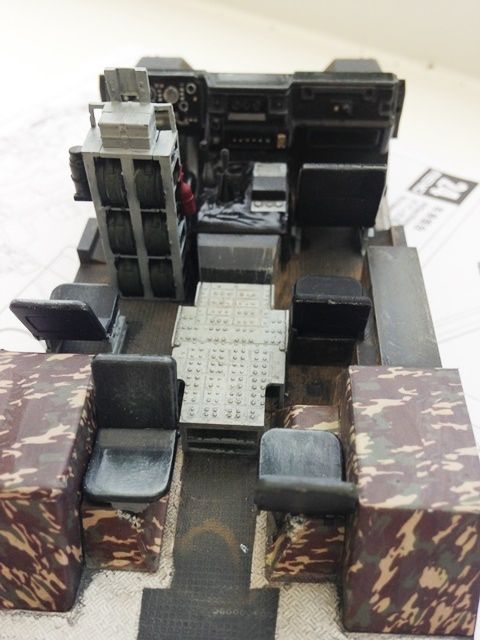
Painted the switches/ fan vents, added the instrument decals to the dashboard, lined the dash with dark grey - need to add some gloss varnish to the whole dash, white glue into the dial apertures and add the grab handles.

Dry fitted the chairs (need Glossing) and ammo rack - needs to be detail painted;


then need to add some dry brushing, wash on the floor, some dirt pigments and silver scratches on the gunners step.

Спасибо за снижается путем (Thanks for dropping by)Comment
-
Lovely work you are doing with the interior.Comment
-
Back on the bench and progresing quite well;
Internals all fitted and weathered
Internal lights fitted

Ammo racks installed
Ammo racks - now normally if you have a raised lip on the side wall, you would normally fit the part to the lip, if you do that with this kit the shell wont fit onto the chassis, what you need to do is align the bottom of the rack with the bottom part of the raised area on the side wall, then the shell will fit onto the chassis, glad i tried this while the glue was still setting else it would have been a nightmare to rectify once the glue had hardened.Comment


Comment