
-
-
Almost done. I hope
Comment
-
Comment
-
Ah, sorry, misunderstood because I had been working on the roadwheels for the track I don’t quite get that bit either, but the third photo I posted is clearly earlier than the other two (the outer road), yet the rims are off the wheels while they are back on in the later ones. Somebody must have seen a use for the tyres but not the whole wheels, so perhaps they fit a pre-war lorry or something, but then why re-install the rims on the spokes? For that matter, why remove the bricks from under the front axle? It’s not like there was a shortage of those, given what this part of town looked like about five years earlier:
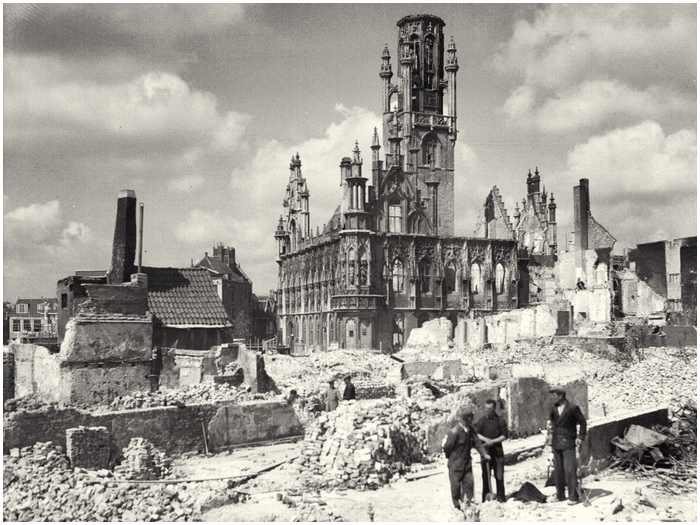 (source)
The spot where the Sd.Kfz. 7 stood is probably a bit to the left of the photo here, as it was taken from behind what is the line of new buildings visible on the right in the post-war photos of the Sd.Kfz. 7 at the start of this thread.
And the same area on 7 November 1944:
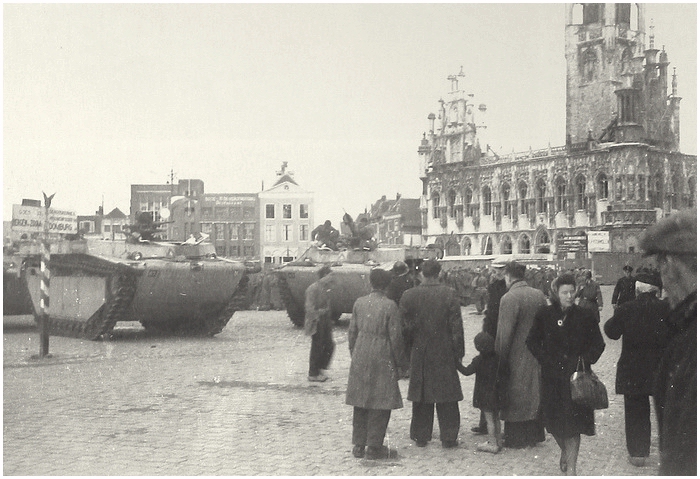 (source)
The LVTs are approximately in the same spot as the Sd.Kfz. 7. The mass of soldiers in the background are German POWs.Comment
-
Jakko,
Sorry for the late arrival to this remarkable build.
I have enjoyed your journey through the trials and tribulations and seen you come out of them successful.
I agree with you about modelling the real item and then seeing the things that are missed or could have been done better or another way.
Keep going, you are near the end and do not worry about sanity - sanity claus comes once a year....
Cheers, Mike.Comment
-
Channelling my inner Chico here Mike, “there ain’t no sanity Claus”….Comment
-
Those hub bits with the studs, I was expecting you to start saying what thread you'd threaded them! talk about disappearing down a rabbit hole, fantastic work on the whole of this.Comment
-
Thanks, as I said before it turned out to be a bit more involved than I had expected. But it’s just a few small bits left now and I can start putting paint on.
It’s something I’ve learned to live with Though there have been a few times with other models where I seriously considered going back and correcting a glaring mistake that nobody else would spot — but I managed to not do that so far.
Thanks. If I thought the thread would remain visible after painting I might have gone that far … but I highly doubt it The bolts are uneven as it is, not all nice and straight and some of different lengths. A better builder than me would probably have made less of a mess of them …
Comment
-
I wasn’t joking — I don’t think the hubs have been built all that well because a lot of the bits are crooked or a little misaligned. The same goes for things like the rocker arms and even the back plate of the cab. This is because of a lack of skill on my part, in things like actually drilling holes straight rather than at a slight angle, for example.
But it doesn’t actually bother me that someone else could have done it better — as long as I’m not dissatisfied with what I’ve made, it’s all good. (If I am, I pull it off the model and try again, like with the cab.)Comment
-
That's right Jakko.....if it looks good to you, job well done. :thumb2: Rick H.Comment
-
Is this mad enough yet, JR?
[ATTACH]445422[/ATTACH]
I added more detail to the engine, such as missing linkages you can see fairly well when it’s in place, plus spark plug cables (thin stretched sprue) while on the radiator grill, I added bolt heads and the hooks that the upper engine covers attach to to keep them closed.
By now I think I’m done adding and improving details on this model now, so here’s some pictures of everything I have at the moment, assembled without glue like last time:
[ATTACH]445423[/ATTACH][ATTACH]445424[/ATTACH][ATTACH]445425[/ATTACH][ATTACH]445426[/ATTACH][ATTACH]445427[/ATTACH]Comment
-
Taking shape nicely.Comment
-
Hi Jakko
Well looking at the page 1 ref. photo I reckon that's pretty close. Most certainly it's a model of what remained of that Sd.Kfz. 7
JimComment
-
Superb work jakko , the additions and alterations are excellent . It looks exactly like the photo , cheers tonyComment


Comment