Scale Model Shop

Collapse

Painting and weathering Dragon kit 6562 - 8 ton Sd.Kfz. 7 Mittlerer Zugkraftwagen

Collapse
X
 
  • Time
  • Show
Clear All
new posts
  • Panzerwrecker
    • Mar 2022
    • 575
    • Los
    • Wales, UK

    #1

    Painting and weathering Dragon kit 6562 - 8 ton Sd.Kfz. 7 Mittlerer Zugkraftwagen

    After completing the equivalent Trumpeter kit in the GB at the beginning of the year https://www.scale-models.co.uk/threa...rack-gb.41003/ and being delighted to get the build published, I figured the Dragon kit I compared it to should get a look in too.

    Click image for larger version

Name:	20221025_222323.jpg
Views:	8
Size:	3.5 KB
ID:	1204463

    As this was already built there were a few issues I was willing to forgive but I did scratch build a new dash as the kit only provides the older unit. The half rubber Dragon front wheel will be replaced by a better represented resin Quick wheel one. Inspiration for my build came from a 1945 image of an abandoned vehicle in Czechoslovakia that had been pulling a Flak gun. There were details like the battered radiator grill that were too late to remedy but I did manage to add damage to one fender. I located the location via Google maps and will be displaying it on a small base.

    Click image for larger version

Name:	20230301_113931.jpg
Views:	6
Size:	6.0 KB
ID:	1204464

    The kit builds up far easier than the Trumpeter kit and although it has its own accuracy issues, in the main it is a far more detailed package. Unlike the Trumpeter build I had already connected the cab to the chassis so the only sub-assemblies to add would be the cargo bed and the running gear. These were all primed in Mr Hobby black primer.

    Click image for larger version

Name:	20230124_164025.jpg
Views:	6
Size:	3.1 KB
ID:	1204465

    Click image for larger version

Name:	20230124_164523.jpg
Views:	10
Size:	3.3 KB
ID:	1204466

    My initial intention was to keep to a plain paint scheme like the Trumpeter kit but for some inexplicable reason I decided last minute to add a whitewash. Unsurprisingly the process didn’t go entirely to plan, and I ended up covering up a lot of previous paint work! My choice of AK worn effects rather than their Heavy chipping fluid didn’t help but rather than stripping it back I persevered and with a little more work with oils to come, I think we’ll get there.

    Progress pics of painting

    The metalwork areas were airbrushed in MRP red oxide and the wooden panels in a Tamiya acrylic Buff/Grey mix
    Click image for larger version

Name:	20230131_192916.jpg
Views:	5
Size:	2.8 KB
ID:	1204467

    The base coat was also with MRP paints
    Click image for larger version

Name:	20230131_193243.jpg
Views:	5
Size:	3.6 KB
ID:	1204468Click image for larger version

Name:	20230131_193318.jpg
Views:	8
Size:	3.4 KB
ID:	1204469

    With hairspray underneath this was chipped back in selected placesClick image for larger version

Name:	20230131_225646.jpg
Views:	5
Size:	2.7 KB
ID:	1204470Click image for larger version

Name:	20230131_230345.jpg
Views:	5
Size:	4.0 KB
ID:	1204471

    Engine bay detail colours blocked in
    Click image for larger version

Name:	20230205_221857.jpg
Views:	5
Size:	6.0 KB
ID:	1204472Click image for larger version

Name:	20230205_221928.jpg
Views:	7
Size:	5.1 KB
ID:	1204473

    The wheels received the same chipping treatment and the tyres brush painted with Vallejo Dark Rubber
    Click image for larger version

Name:	20230205_222051.jpg
Views:	6
Size:	4.3 KB
ID:	1204474Click image for larger version

Name:	20230205_222222.jpg
Views:	6
Size:	4.3 KB
ID:	1204475

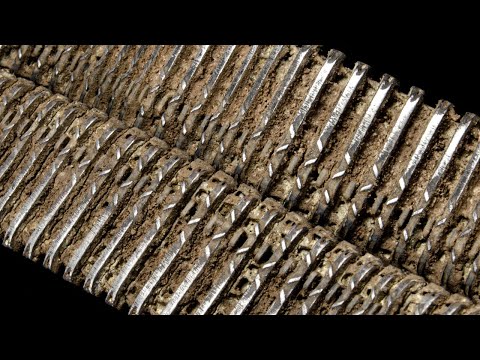
    The tracks were airbrushed in a Tamiya acrylic mix of Dark Iron and Flat Earth. The rubber pads were brush painted in Vallejo Dark Rubber
    Click image for larger version

Name:	20230220_221540.jpg
Views:	5
Size:	3.3 KB
ID:	1204476

    Licence plate and weight stencil decals added from the box. Strangely no instrument decals are included with Dragons 8T range of kits so a generic set was sourced from Alliance Modelworks
    Click image for larger version

Name:	20230413_010529.jpg
Views:	6
Size:	4.3 KB
ID:	1204477Click image for larger version

Name:	20230413_010558.jpg
Views:	7
Size:	4.2 KB
ID:	1204478Click image for larger version

Name:	20230413_010611.jpg
Views:	5
Size:	5.3 KB
ID:	1204479

    As already mentioned, the whitewash application was a struggle so oils will be used to tone down the effects I managed to salvage. All the chipping work previously carried out on the bonnet/hood was virtually wiped out:loudly-crying:
    Click image for larger version

Name:	20230509_021447.jpg
Views:	5
Size:	4.1 KB
ID:	1204480Click image for larger version

Name:	20230509_021758.jpg
Views:	5
Size:	4.3 KB
ID:	1204481Click image for larger version

Name:	20230509_022115.jpg
Views:	5
Size:	4.8 KB
ID:	1204482
  • Panzerwrecker
    • Mar 2022
    • 575
    • Los
    • Wales, UK

    #2
    Moving onto the running gear, as the tracks were plastic, they were weathered without enamel washes in a similar fashion to Uncle Nightshift's excellent tutorial video

    Keeping the rubber track pads free in the process meant careful application of washes and continual clean up after speckling.
    Click image for larger version

Name:	IMG_4801.JPG
Views:	12
Size:	1.9 KB
ID:	1204483

    The chassis and the underside of both cab and cargo bay were weathered first by airbrushed Tamiya buff, followed by an application of AK Groundwork Light mud and completed with light and dark oil washes and speckling.

    Click image for larger version

Name:	20230704_222018.jpg
Views:	11
Size:	3.7 KB
ID:	1204485

    Click image for larger version

Name:	IMG_4799.JPG
Views:	14
Size:	5.2 KB
ID:	1204484

    A very diluted (White Spirit) mix of Abtielung oil Light rust and MIG pigments rubble dust made a nice dry rusty effect which was added to the manifold, portions of the exhaust and worn metal areas like the sprocket rollers and winch cable roller. Much of this will not be visble when placed on the base but the experimentation process is good practice.

    Progress pics as the effects were layered
    Click image for larger version

Name:	IMG_4811 (3).JPG
Views:	11
Size:	3.7 KB
ID:	1204486Click image for larger version

Name:	IMG_4812 (2).JPG
Views:	9
Size:	5.7 KB
ID:	1204487Click image for larger version

Name:	IMG_4813 (2).JPG
Views:	7
Size:	4.8 KB
ID:	1204488

    The wheels have been lightly weathered with the same effects as the chassis and the task of lining them all up went without incident. It is always a delicate mission getting all these overlapping and interleaved components to fit as they did before paint. The wheel fit to the axles was a tad loose upon building, so a little paint on both has made the fit nice and snug. As a result, I deliberately left the middle row pair un-glued, so I had some wiggle room, and relied on attaching the inner and outer pairs to their axles instead.

    Click image for larger version

Name:	IMG_4835.JPG
Views:	12
Size:	4.7 KB
ID:	1204489Click image for larger version

Name:	IMG_4836.JPG
Views:	13
Size:	4.2 KB
ID:	1204490

    As the sprocket is designed not to rotate, the track runs must be threaded carefully over them. Due to the addition of paint they had to be gently pressed against the sprocket pads ensuring all the guide horns located snugly between the rollers. The last task was to attach track both runs. I made sure the connection was on the top of the runs to make handling easier. Scraping away the paint on the locating surface of the connecting link on each run and inserting an unpainted track pad was an easy task. A spot of rubber CA and a light squeeze with a pair of tweezers was all that was required to get a secure connection. The pad was then primed and painted. To blend them in completely the same acrylic 'rain wash' will be applied to both the pads in the next session.

    Click image for larger version

Name:	IMG_4837.JPG
Views:	11
Size:	4.1 KB
ID:	1204491Click image for larger version

Name:	IMG_4841.JPG
Views:	9
Size:	3.4 KB
ID:	1204492Click image for larger version

Name:	IMG_4842.JPG
Views:	9
Size:	3.3 KB
ID:	1204493Click image for larger version

Name:	IMG_4847.JPG
Views:	11
Size:	4.0 KB
ID:	1204494

    So this is where I am up to as of today. As the front wheel axle connection point is very shallow the remaining front road wheel will stay off for now to aid handling. Masking the connections between chassis and cargo frame was a worthwhile exercise and has meant the cargo bed is a good fit and can be repeatedly dry fitted.

    Time to paint all the accessories, add the equipment rack and praphanalia dumped on the cargo bed

    Comment

    • Andy T
      SMF Supporters
      • Apr 2021
      • 3239
      • Sheffield

      #3
      Wow, that's some stunning work!

      Comment

      • Tim Marlow
        SMF Supporters
        • Apr 2018
        • 18880
        • Tim
        • Somerset UK

        #4
        Superb build and weathering Los. Just superb!

        Comment

        • Jim R
          SMF Supporters
          • Apr 2018
          • 15636
          • Jim
          • Shropshire

          #5
          Looking excellent. Nice explanation of the processes involved.

          Comment

          • Guest

            #6
            That looks very good and properly dirty Excellent work, if you ask me.

            I guess it’s a bit too late to point out that there should not be a manufacturer’s badge on the grill, though?

            Comment

            • scottie3158
              SMF Supporters
              • Apr 2018
              • 14197
              • Paul
              • Holbeach

              #7
              This is outstanding I have started building a 7/1 if it turns out a fraction as good as this I will be a happy man.

              Comment

              • Panzerwrecker
                • Mar 2022
                • 575
                • Los
                • Wales, UK

                #8
                Originally posted by Andy T
                Wow, that's some stunning work!
                Thanks for the compliment Andy

                Comment

                • Panzerwrecker
                  • Mar 2022
                  • 575
                  • Los
                  • Wales, UK

                  #9
                  Originally posted by Tim Marlow
                  Superb build and weathering Los. Just superb!
                  Cheers Tim, glad you like it

                  Comment

                  • Panzerwrecker
                    • Mar 2022
                    • 575
                    • Los
                    • Wales, UK

                    #10
                    Originally posted by Jim R
                    Looking excellent. Nice explanation of the processes involved.
                    Cheers Jim. A more detailed explanation can be found on my blog https://smallislandscalemodels.blogspot.com/2023/02/

                    Comment

                    • Panzerwrecker
                      • Mar 2022
                      • 575
                      • Los
                      • Wales, UK

                      #11
                      Originally posted by Jakko
                      That looks very good and properly dirty :smiling3: Excellent work, if you ask me.

                      I guess it’s a bit too late to point out that there should not be a manufacturer’s badge on the grill, though?
                      Thanks Jakko

                      I know, I wish I had removed it TBH. There are a few other things that I would have improved on if I had built it recently, as I explained on my build log on my blog page below. Some of which I gleaned from your excellent build from an image taken in your home town

                      As the kit has been built up with displaying the engine in mind, the trumpet style ‘early’ horn was replaced with the correct style circular Bosch item, taken from the Trumpeter kit.

                      Dragon do not provide the late style instrument panel and the kits centrally mounted older styled one was already fitted. Although the Trumpeter kit’s panel would still have required extending as the Dragon cab is a few millimetres wider I didn’t have one spare so building one from scratch was the only alternative.

                      The bonnet/hood photo-etch tool clasps were replaced with 3D resin ones and again the headlights were replaced with a smaller ‘later’ style set. (I since hollowed out the kit lamps) Although the radiator housing manufacturers logo would have been absent on a vehicle this late in the war, the fact that I have already attached it makes removing it difficult so that will also have to remain.

                      The cab canvas metal hoop frame should be attached to the rear of the cab side panels. All the kit's illustrations bear this out but strangely the instructions have you attach it to the cargo wooden frame! I had already draped some green stuff tarps over it before I realised, so this will unfortunately remain also.

                      Other inaccuracies include the under-seat metalwork. It should sit further back on the floor and not sit flush with the cab side panels and there is no driver’s seat cut out for the deeper cushion. Unlike the Trumpeter kit they have got the cushion layout correct. Another more visible anomaly are the cargo bed hinges. They look to be far too chunky and on the side panels, have no detail on the inner faces.

                      Comment

                      • Panzerwrecker
                        • Mar 2022
                        • 575
                        • Los
                        • Wales, UK

                        #12
                        Originally posted by scottie3158
                        This is outstanding I have started building a 7/1 if it turns out a fraction as good as this I will be a happy man.
                        Cheers Paul and go for it! Im sure it will put a smile on your face:smiling4:

                        Comment

                        • Panzerwrecker
                          • Mar 2022
                          • 575
                          • Los
                          • Wales, UK

                          #13
                          Originally posted by Panzerwrecker
                          Thanks Jakko

                          I know, I wish I had removed it TBH. There are a few other things that I would have improved on if I had built it recently, as I explained on my build log on my blog page below. Some of which I gleaned from your excellent build from an image taken in your home town

                          As the kit has been built up with displaying the engine in mind, the trumpet style ‘early’ horn was replaced with the correct style circular Bosch item, taken from the Trumpeter kit.

                          Dragon do not provide the late style instrument panel and the kits centrally mounted older styled one was already fitted. Although the Trumpeter kit’s panel would still have required extending as the Dragon cab is a few millimetres wider I didn’t have one spare so building one from scratch was the only alternative.

                          The bonnet/hood photo-etch tool clasps were replaced with 3D resin ones and again the headlights were replaced with a smaller ‘later’ style set. (I since hollowed out the kit lamps) Although the radiator housing manufacturers logo would have been absent on a vehicle this late in the war, the fact that I have already attached it makes removing it difficult so that will also have to remain.

                          The cab canvas metal hoop frame should be attached to the rear of the cab side panels. All the kit's illustrations bear this out but strangely the instructions have you attach it to the cargo wooden frame! I had already draped some green stuff tarps over it before I realised, so this will unfortunately remain also.

                          Other inaccuracies include the under-seat metalwork. It should sit further back on the floor and not sit flush with the cab side panels and there is no driver’s seat cut out for the deeper cushion. Unlike the Trumpeter kit they have got the cushion layout correct. Another more visible anomaly are the cargo bed hinges. They look to be far too chunky and on the side panels, have no detail on the inner faces.
                          There are a few other features like the additional planking on the tilt frame and the drooping track fender on the passenger side that all could have been replicated from scratch. too

                          Comment

                          • Guest

                            #14
                            Originally posted by Panzerwrecker
                            your excellent build from an image taken in your home town
                            Not my home town — the town where I went to secondary school I live about 10 km away.

                            In any case, the model looks excellent

                            Comment

                            • Richard48
                              SMF Supporters
                              • Apr 2018
                              • 1883
                              • Richard
                              • Clacton on Sea

                              #15
                              Outstanding work.Jaw dropping what you have made so far.Really great.
                              Richard

                              Comment

                              Working...