Mr dissolved putty is cellulose based, so will do what you want. Etched into the surface is what I mean by “incised”. After you put the filler on I would run a scriber down the line to clear it of putty. No point in having to rescribe the detail if you don’t need to.

-
-
Mr Dissolved Putty is here, I applied it last night, will start sanding after lunch. Fingers crossed!
Comment
-
Sanded, back in the paint booth (3rd time)Comment
-
I've had enough sanding, so I pushed ahead with masking it off. I used Mission Models HULL RED ANTI FOULING NORFOLK 65A MMP-111 with a few drops of flat red added and made sure to make enough to have some left over for touch up.
Thankfully, no paint came off on the tape!
Now I can finish painting the hatch insides and then gluing them into place, hopefully a nice neat pair of rows (they are just sitting in place currently, all crooked & haphazard-looking).
Then at last I can start on the missile smoke and lights!Comment
-
Good for you Neil that all went well. With LEDs attached I'm guessing you're lighting the sub up.
Cheers,
RichardComment
-
Looking pretty fine Neil. Nice job :thumb2:Comment
-
Thanks, yes, I plan to make the cotton smoke light up.
Now the BIG question: do I coat the model with clear gloss before applying decals? And AFTER decals, then coat with matt clear? The sub has an excellent matt finish now, I'm nervous about this. :nerd:Comment
-
I kind of doubt you’ll need varnish, either before or after adding the decals, especially if you use Micro Set and Sol on them.Comment
-
In such a small scale I would thin coat gloss varnish then decal then varnish again with gloss coat then over that with matt. The gloss varnish in between the decaling and matt varnish is to create an even level of the decal film and the surface and to further achieve a smoother surface is to wet sand lightly with very fine grit paper. Polish if you want to. I heard there's a 7 or 12 steps to a mirror finish of sanding and polishing for car modelers but that could be a myth.
It also depends on the kind of decals you are working with. If they have that shine on the backing paper and the film around the image isn't too visible or thick then half the battle is won. If they look matt and thick then chances are they will react like paper and not conform to any raised surface and most likely silver.
Weathering finish sometimes camouflages bad decal application especially armour but for planes and ships there is no escape.
Remember that the varnish coat has to level of and not dry immediately on application for a smooth finish or you'll get orange peal surface and at the scale you're working on will look like coarse sand paper viewed to scale.
Not wanting to scare you but if done properly and patiently you'll get a reasonable good finish to decaling. Just treat it as a separate process on its own and not a step in a build.
Applying the decal.
Cut separate images from the backing paper and dip into luke warm water until the backing paper is soaked then remove and place the backing paper image facing up on a paper towel or tissue. There will be a thin puddle on the backing paper to let the carrier film and image detach on its own and not float all over the place. The moment you can feel it slide then it's ready to apply. Grab one side of the backing paper with a clamp tweezer and with a paint brush slide the carrier film and image onto the pre-prep'd surface. Moist the paint brush and surface if you want to adjust the decal position. And that's all to it.
Cheers,
RichardComment
-
Since the missile portion seems likely to make the model top-heavy, I'm extending the pegs on the plastic base,
and adding some tabs to screw it down onto the wooden base, so any jiggling the switch is less likely to capsize the boat.
Decided to do some touch up painting, the Mission Models paint is really odd.
It has a mottled look after handling. Maybe I should have let it dry longer? Well, after the touchup coats I followed up with 2 coats matt clear...
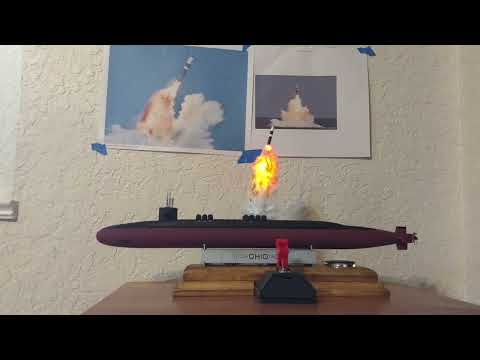
Finally, completed the electrical circuits!
Now with the sub mostly complete (lacking decals and scopes), the base assembled and the electrical finished and tested,
testing different configs of smoke and glues. Looks like plain Elmer's white glue is the best.
Comment
-
Looking fwd to the " smoke " effects Neal . That sub hull looks ok.Comment
-
Thanks, John! To be clear, the "smoke" is static cotton.
Comment
-
Complete, except decals. Waiting for an LA class sub kit to steal the decals.
Comment

Comment